Ear Post Rivets - page 3
©2004 Judith Hoffman
1 | 2 | 3 | 4
Please note: be sure to wear a dust mask anytime you're not sure about the material you're working with. Also, objects that are brittle aren't good candidates for riveting. They are too likely to break with the pressure that a rivet head places on them.
To drill the hole try a #69 drill bit for the sterling ear post, and a #70 drill bit for the gold-filled one. You should make a test on a scrap to make sure the ear post is a firm fit in the hole you drill. Put a little beeswax or similar lubricant on the drill bit. Experiment with your brand, you may need a different drill bit size. Some household drills will take the tiny wire drill bits. Some require a special colette. It can be tricky to use such a tiny bit on a large drill. If you have a stand for it, that would help a lot. Or you could use a Dremel Moto Tool or a jeweler's flex shaft.
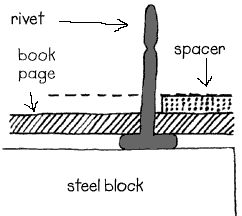
After drilling the hole through the page and the object you want to attach, put the ear post through the holes. Set it on the steel block and cut it off, leaving slightly more than the diameter of the post sticking up. Use a flush cut nipper or file the end of the post flat after cutting with a wire cutter. A scrap of 20 gauge brass works as a measuring device. Lay it on the surface of your work and use it to set the height of your flush cut nippers. In the picture at the right, the dotted line indicates where the flush cut nippers rest against the top of the brass spacer. If you cut your earpost off here you will have a good amount of material to form the rivet head.

Flush cut nippers are laid along the top of the 20 gauge brass spacer. The rivet is cut off along the dotted line. This leaves a stub that can be hammered down to form a rivet head. I didn't draw in the second layer (the diagonal slashes would normally be two pieces of material) which would be the object you're attaching to your book.