
Making Tooth Icon, Part One
©2007 Judith Hoffman
Go to part 2
|
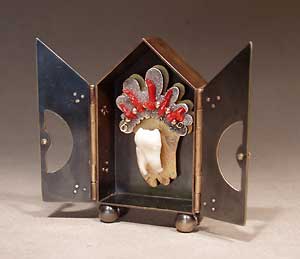 |
Tooth Icon, ©2007, 2 x 3-1/4 x 7/8 inches, brass, copper, sterling silver, coral, tooth, gold filled wire and beads, fabricated. See the blog entry here. Web page with larger images here.
|
I tend to use very basic techniques, but have aquired some useful tools over the years. I used a rolling mill to put some texture on a few of the pieces of metal, an acetylene torch (mixes with air), and jeweler's hand tools. I now also have a metal shear, which will make box making much easier.
I started with the tooth and a little box (below) made of brass that was an old abandoned project. The tooth is my son's. He gave me two, and I promised to make him something with one of them, the other I get to keep. I pulled out all kinds of things that I thought might work with the tooth. There were pieces of shell that were vaguely tooth shaped, some watch parts, some found plastic things. The only ones that seemed really right in the end were the pieces of coral.
|
 |
A mock-up of my original plan. I wanted black plexiglass in the back and three layers of metal: brass, copper and silver. The legs are brass beads. I drilled little holes in the bottom so they wouldn't expand and possibly blow up when heated. If you're interested in making small boxes, look at Tim McCreight's The Metalsmith's Book of Boxes & Lockets. The photos are incredibly inspiring and there is a lot of good information there.
|
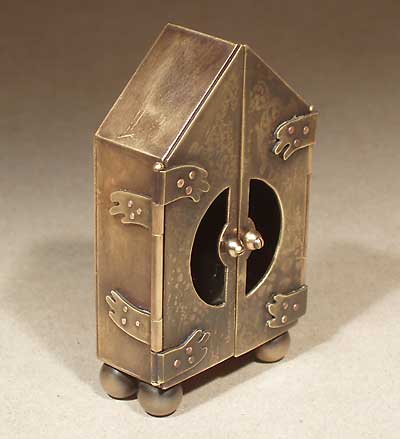 |
Hours later, I have doors on the box, vaguely tooth shaped hinges and little handles. I used earpost rivets to attach the hinges. The handles are little beads, held on with 0-80 nuts and bolts.By now I have decided to leave out the black plexiglass in the back and just oxidize the brass.
|
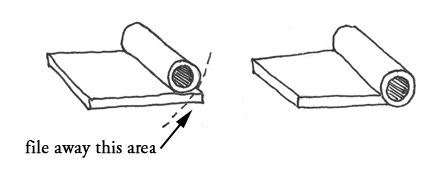 |
I found this type hinge in a book on Medieval Icons. I make it by soldering tubing to a piece of brass. It's easy to make these in strips, about 3 inches long. Then you can cut off the width you need. Make the brass base fairly wide, in case you want to do something decorative. The hinge on the left above is on the doors of the icon. The hinge on the right is on the side walls. The different attachments of the tubing allow the doors to lie flat against the box.
|
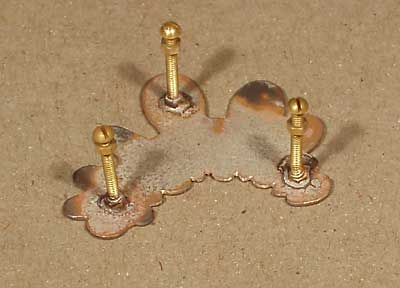 |
Above is the first halo shape I made. The halo has nuts and bolts soldered to the back of the piece. I screwed the bolts into the nuts, and then set the nuts on the silver piece so I had a large flat surface to solder to. Then I planned to trim the bolt heads off so I had threads on both ends. I left a nut on the bolt when I trimmed it. Removing the nuts "heals" the threads so they still work. When I soldered on the bolts and nuts they sank into the silver a little and are crooked. Too much heat, and the silver halo was too thin. So I cut out a second shape to make the one on the left below.
|
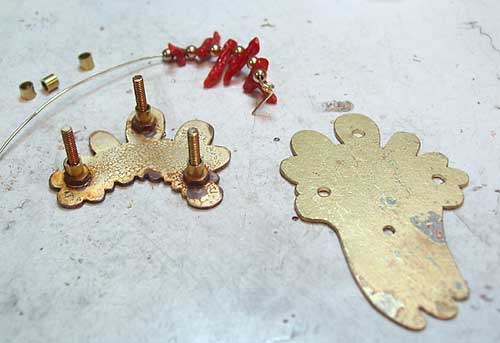 |
I accidentally got this nice gold-looking heat patina on the brass background piece (right) so I started trying to avoid re-heating it. There is also a rolling mill texture on it. I wanted to put the nuts through the brass shape and attach the whole unit into the brass icon box. The coral and gold filled beads were strung on gold filled wire and attached to the sterling silver halo with little twists. The little pieces of tubing are spacers that will hold the parts away from the back of the box. There are also spacers on the nuts soldered to the back of the halo. Here you can see that the heads on the bolts have been sawed off so I can pass it through the back of the icon box.
|
| Part two, fusing on the silver halo. |
|