Kids Lab Pinhole Camera
I was browsing around Flickr the other day and came across magnifik 2.0's kidz lab pinhole camera set. I found this on the internet and it came today.

Here are the parts. The white arrow points to the little springs that work the shutter. They sent a spare. This was the hardest part to assemble. I found the spring a little flimsy. It didn't make the shutter snap up all the way, allowing light to leak in. In the photo the angle is less than 90 degrees. I bent it apart so it's a little more than 90 degrees. Now it snaps up nicely. The rest of the camera was pretty easy to snap together.
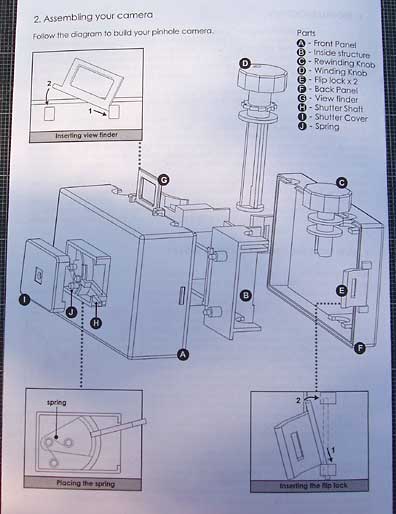
My biggest problem was with this drawing of the instructions. Everything else is verbal, which I usually hate, and the assembly instructions are visual. For some reason I found it a little hard to read. Maybe because I'm sick with a virus? I did get it all together, no parts left over. Because I had it around, I used a piece of brass shim with a .5 mm pinhole instead of the aluminum foil included in the box. According to this website, my 2 inch deep camera needs a .3 mm pinhole. (Scroll down to find the calculators button.) I will take my own good advice and go out and take a test roll with notes soon.
Here are the parts. The white arrow points to the little springs that work the shutter. They sent a spare. This was the hardest part to assemble. I found the spring a little flimsy. It didn't make the shutter snap up all the way, allowing light to leak in. In the photo the angle is less than 90 degrees. I bent it apart so it's a little more than 90 degrees. Now it snaps up nicely. The rest of the camera was pretty easy to snap together.
My biggest problem was with this drawing of the instructions. Everything else is verbal, which I usually hate, and the assembly instructions are visual. For some reason I found it a little hard to read. Maybe because I'm sick with a virus? I did get it all together, no parts left over. Because I had it around, I used a piece of brass shim with a .5 mm pinhole instead of the aluminum foil included in the box. According to this website, my 2 inch deep camera needs a .3 mm pinhole. (Scroll down to find the calculators button.) I will take my own good advice and go out and take a test roll with notes soon.
Labels: Photography
posted by Judith Hoffman at 5:05 PM
![]()
![]()

1 Comments:
Cool, I just bought the same Pinhole cam yesterday, I was quite disappointed at the shutter release so what I did was I tied a rubber band around the lever and the winding knob to prevent it from accidentally opening. I just take the rubber band off when I'm about to shoot.
Post a Comment
Links to this post:
Create a Link
<< Home