Monday, July 21, 2008

Primitive Wire Edge Binding


Another binding test. This one is 2.75 x 3 inches. I made it with black Arches Cover, steel wire and black waxed cord. The drawing was done with Dr. Ph. Martin's white Bombay India ink.


To make the cover I cut out a piece of paper 3 inches high and 5.5 inches wide. I folded it in half and punched two holes in the fold. I always make a template for the holes so they are spaced the same (more or less) on each page.

This book was fairly quick to make, but when I spread it out to stand, the pages tend to not pivot easily. I have to carefully place each one to make the page edges parallel. I don't know if that's a bad thing, but I am working on a book with metal hinges right now, so I do notice it.

There are larger photos and more views on flickr. Click on "all sizes" above the image to see it larger.

For more on wire edge binding see this post and this one.

My mother-in-law is having some problems, so posts will be sparse for awhile. I haven't quit blogging.

Labels:

Wednesday, June 18, 2008

Wire Edge Binding Test


Wire edge binding test.
Aine Scannell asked about using single sheets for wire edge binding. Here's a test I did to see how lighter paper would work. I think the paper was Super Fine Text from Daniel Smith. There are larger photos and scans of my notes to myself in my flickr set, Tests, Tools, Tips.


You can see in this detail that I wasn't consistent about tying the knots.

Labels:

Friday, January 05, 2007

The acid test

I decided I needed to do some tests before etching the parts for the Dream Focusing Device (pat. pending). I tested beeswax, Staz-On stamp pad ink, Sanford Industrial Sharpie marker, Sanford Industrial Sharpie (extra fine) and the older, extra fine Sanford Sharpie. Each one seems to have it's pros and cons. I want the newer parts to look related to the older half moon shape that I made years ago.

I rock the pan every 10 minutes and turn the tests over every 20 minutes. The length of time needed for the etch I want varies, depending on the age of the ferric chloride. Most of my etches take between one and two hours. Please make sure you get all the safety information about etching before you try this. It gives off toxic fumes, and the acid is dangerous.

Beeswax resist
Beeswax has been my favorite resist for a long time. The line I get is fine. I scratch in the beeswax with an old dental tool, so it's similar to drawing.

Staz-on ink pad resist
To get the inkpad ink on the metal, I just blotted it on. The pad is raised above it's plastic case. Along the edge of the blotted area it leaves a nice texture. I scratched in the ink after it was dry. The Staz-on ink pad is available at Volcano Arts. It's on this page. It works great for etching rubber stamp images. Be sure to get some cleaner at the same time.

Sharpie Industrial fine point, side 2
The Industrial Sharpie is supposed to resist chemical washes and steam up to 500 degrees. I find it is the best pen resist, but the line isn't very thin. It was easy to find in our local office supply store.

Sharpie industrial x-fine
The Sharpie Industrial also comes in extra fine. The scale is deceptive in this photo. The scrap I used for this test is about half as long as the scrap for the industrial fine point Sharpie, so the line is much finer. And this ink also lasts a long time in the acid.

Sharpie ultra fine
This is the older Sharpie, extra fine. It has black lettering on the side of the pen. After 40 minutes in the acid, the ink started wearing off. I could have cleaned it up and gone over the lines again, but it's hard to put them exactly where they should be.

All these images link to bigger versions on Flickr. They also all appear in my photoset "Testing."

Conclusion: I will definitely make sure I keep both sizes of the new industrial Sharpies around. The ink stays on well in the ferric chloride. I plan to etch the dream focusing device using a combination of the extra fine Sharpie industrial marker and the beeswax for the numbers I want.

Labels:

Friday, December 01, 2006

Crimp this! Crimp that!

We had our heat worked on several weeks ago. One of the guys left an interesting tool one day. I immediately took it into my studio to see what it would do. (I did give it back the next day!) It was a crimper, used for making heating ducts a little smaller, so they fit together well. Erwin's crimper was a three blade version, with a very nice handle. He says they don't make them any more. Too Bad.

I did find an assortment of them on the internet, and ordered one made by 
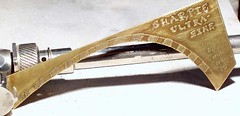
Malco. It has five blades, they do also make three bladed crimpers. It feels very solid and has a nice handle. Today I was waiting for the inspector to check off the work, so I played with some copper. I used 24 gauge annealed copper for most of the tests. For one test I used tooling copper, which is around 30 gauge, and very soft. I sanded the copper pieces with 400 grit wet or dry sandpaper first. Then they were dipped in liver of sulfur, polished with a very soft brass brush. I repeat this until I like the color. Then I crimped in different patterns.

I like the look better than the metal crimpers that look like pasta rollers. (I have no idea what they're called.) This irregular texture is more appealing to me. However, it's a fairly large scale texture and might not work for jewelry. The crimps are about 1-7/8 inches long and 1/8th of an inch deep. It isn't a sharp fold in the metal. Below are the results. If you want to see these enlarged, check out my flickr photo set, Testing.


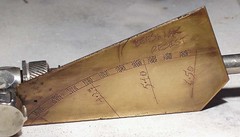
Sample one. This is the pattern I get crimping along one edge. This piece of copper is 24 gauge, about 4 inches wide.


Sample two. I was trying for rays here. I think the three blade crimper would be better. This is 24 gauge copper, about 2.5 inches wide.


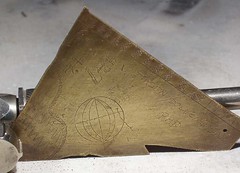
Sample three. This is a piece of tooling copper, about 30 gauge. I scribbled on the back with a ball point pen, then colored the metal with liver of sulfur, crimped from both sides, and colored the metal again. 4 inches wide.


Sample four. I crimped from all angles, sometimes crimping over other crimps. 24 gauge copper, 2.5 inches wide.


This was sample four, hammered almost flat. This one starts to get interesting to me. A little more crimping and hammering might make it very nice.


Here is the back of sample four, I think it could be interesting with a little more sanding and coloring.


And this is sample two, hammered almost flat.

Labels: ,