Sunday, February 26, 2006

7 Extinction Events Finished!
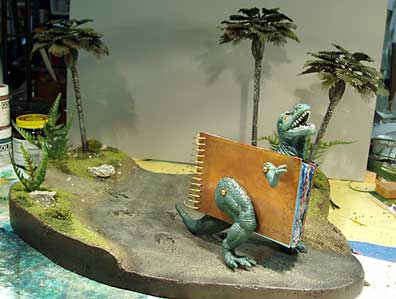
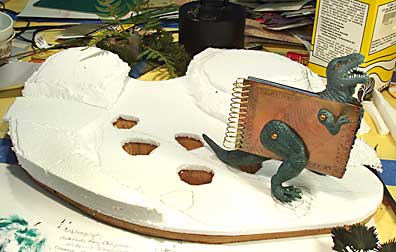
I’m sorry I didn’t post in the middle of the week. The flu caught up with me, but I’m much better now. But, here is the finished landscape.

7 Extinction Events

I’m very pleased with this. I love having a setting for the book. Unfortunately, when the book is open, the dinosaur doesn’t look right. I don’t think it’s a fatal flaw.

After building up the hills I painted the whole thing black, then put on a layer of very dark earthy brown. I dry-brushed a lighter brown on the hill areas and grayish ochre on the creek bed. Then I painted the rocks several light shades. Then I put on the grass, palm leaves, bushes, etc. These two web sites were very helpful: Conquest Miniatures and Dr. Faust’s Painting Clinic. Email me if you want more details, I'm leaving out some here because it's not that interesting.

When I got the idea to do the landscape, I thought “that’s a hobby, it should be fairly easy to do. Not like the hard and tedious work of making jewelry or metal objects.” I was so wrong! There are lots of different ways to accomplish a given effect. You have to know your materials and a wide variety of techniques.

It was hard to find the exact materials that these online tutorials talk about. Our local “big” hobby store didn’t have much of a selection of landscaping materials or paint. I went to J & M’s Hobby House in San Carlos (California) and was able to get most of what I needed. This is a nice hobby store. They have K&S metal supplies (brass and copper in sheet, tubing and strips). The service is good, the guy I talked to was very knowledgeable and helpful.

What’s next? I have to clean off my big worktable and take photos. I will show something of my photo process in the blog. Then I want to start on two metal projects that have been languishing on my bench for a long time. The smaller, almost finished one is a tooth icon. I’m not even sure if I’ll like it when it’s done, but I’m committed to finish it. The other is a time consuming project that I have barely started and need to get back to. I also have an idea for several more books with landscapes, but they will wait for a while.

Labels:

Monday, February 20, 2006

Three day weekend, lots of art time

I got a lot done this weekend, it was lovely!

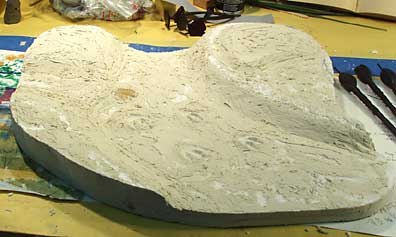
The landscape looked blocky, like piles of starofoam, so I first filled in the gaps with spackle. There is also spackle smeared across the tops of the hills.


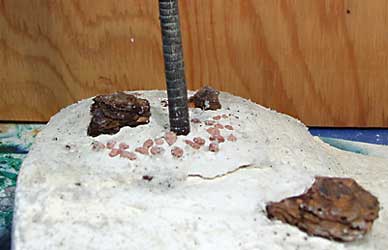
The tops of the little hills were still very flat, so I pushed the palm tree trucks into the starofoam and then built up some more surface with DAS Pronto clay. I mixed it with a big blob of PVA to increase adherence. DAS isn’t supposed to shrink when it dries, but it did shrink a little where I hadn't mixed it with the PVA. You can see a horizontal crack that I'll have to fix.


Here's a detail shot. You can see a palm trunk and some redwood bark that I used to simulate rocks. The smaller rocks are from the hobby store. I have also painted the ground with coarse pumice gel, and the creek bed with fine pumice gel.

I am taking an assemblage class right now with Inge Infante. So I also have two boxes in progress. Three dimensional art is sometimes very hard for me and I have admired Inge's boxes for years. This seems like a good way to get a little more experience in assemblage. Hopefully it will translate into some little metal boxes I want to make.

Labels:

Saturday, February 18, 2006

Blog comments and a question about making charms

I can see in my web site statistics that readership is up since I announced my blog. I am so pleased to see that people are enjoying it. It surprises me that there aren’t many comments, but it also fits my personal pattern on blogs. I only comment if I think I can add something no one else would know about.

In my first entry, I said I thought the blog would be good for my students. I hope this doesn’t convey the impression that other people can’t ask questions, or weren’t invited to participate. Anyone who wants to ask about things is welcome to.


charms
Nancy Rushton emailed me and asked if I know how she could make charms like these from Wells Ware.

If anyone out there has ideas for Nancy, please chime in. If you’re more comfortable emailing me directly, that’s fine. I’ll post it in the blog. Let me know if you want to be completely anonymous.

Here are the possibilities that come to mind:

1. They look like they're soldered with low temperature solder (using a soldering iron). I might be wrong about that. I don't teach low temperature soldering, but I don't think it's hard to learn. I use what's actually called braising (jewelers usually say soldering when they mean braising), and it couldn't be done with glass in place. It's much hotter than low temperature soldering.

2. You could make a bezel, assembling it with braising, drop your image and glass in, and fold over the edge to hold it in place. You would make a “sandwich” with layers of glass and the photo image, and then bend the bezel around it to fit.

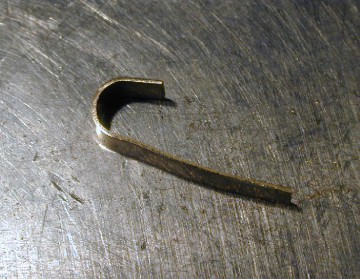
bending the bezel
Here the bezel is being bent to shape. Normally I form the bezel around the object I want to hold with it. This is from Liz’s Jewelry Bench. She has a bezel making demo on her web site. Most bezels have a solid metal back, although you could cut a window in the back.

3. To make a two-sided charm, you could use fine silver bezel wire. It comes in long strips. You would have to bend it to fit, and solder or braise the seam. Then you could fold both the front and back edges over to hold your glass. This method assumes you want a two-sided charm. You would also have to solder on a ring for hanging.

4. Another way to sandwich glass and a small image would be to use metal foil tape around the edge. It's very low tech. You would have to embed a wire for your hanging loop. I have seen metal tape in copper and aluminum, but don’t remember where.

5. Another possibility would be to buy a bezel cup and drop everything into it, then fold over the edges.
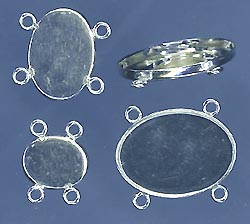
some bezel cups.
These bezel cups are from Monster Slayer.
The sides on these look too low for your needs. I thought Rio Grande had a big variety of shapes and depths. Now I can’t find the bigger, deeper bezel cups in the Rio Grande catalog. A local jewelry supply place might have some. Make sure you know the depth of your “sandwich” when you go. You would have to cut your glass to fit the pre-made bezel cup.

I am assuming you can cut glass. You could also use Plexiglas, which could be easily cut with a jeweler's saw. Of course it would possible scratch over time. But you could scratch a design in it if desired.

The next two ideas depend on the baking temperature of the materials, and the tolerance for heat of the glass or Plexiglas and photos. I don’t know anything about this.

6. Fimo or a similar material might work. I think you could embed a hanging wire, too. I don’t know much about Fimo, but when I use it, I don’t bake it in the oven that I cook our food in. Never mix art materials and cooking. I do know that Primo bakes at 275 degrees.

7. Precious Metal Clay might work. It’s basically silver (or gold) made somehow into a Fimo-like material and is baked in a similar manner. I assume it also has the same gas producing quality when baked, so you might not want to bake it in your household oven. I’ve never used this stuff, but it’s become very popular.

When you find a solution, I would love to hear about it. They are “charming” charms.

Labels:

Tuesday, February 14, 2006

Progress on 7 Extinction Events

I tend to be very slow and meticulous when I work. My Dad has the same trait. Often I wish I could loosen up, and finish more projects, but I’m trying to just accept it. When I use a new technique for the first time, I do lots of research, and then some tests. The landscape for this book is a new technique for me.

I got some very dense polystyrene for modelers to block in the land areas. To get clear dinosaur footprints in the creek bed, I made them with Primo. They will be embedded in the creek bottom.

Building up the polystyrene to make the landscape
In the photo above the base is cut from a piece of plywood. I roughly cut polystyrene layers into the shapes I want. There is a small rise in the back for the palm trees. There are also holes in the bottom sheet of polystyrene so I can set the footprints in. All these parts were glued together with PVA and left to dry under books. I will put a few screws through the polystyrene and into the plywood base when it’s dry. There is some disagreement about whether or not PVA works with polystyrene, but I didn’t want to use a non-water based glue. After leaving the landscape under books for two days it feels like a very firm attachment.

There is often a point in the middle of a big project when I want to quit. I could just stick it in a cupboard and start something new and more exciting. I’m struggling with that right now. But looking at the landscape gets me excited again. Does anyone have any tips for staying engaged with your work when you're running out of steam? I hope it's not just me.

Labels:

Sunday, February 12, 2006

Tips Page Added to My Web Site

I just added a tips page to my web site. I sometimes find information I want to pass on to my past students. Maybe I have taught them something that I now think is a bad idea, like mixing liver of sulfur in hot water. Or I have found a tool that they might want to know about. My tips page is the place where I can list changes, corrections and new information.

I seem to be coming down with something, so I will wait a few days to post my progress on 7 Extinction Events. My landscape form is glued together and drying under books and my palm trees have most of their paint. I'm going to watch the Winter Olympics. Not figure skating, I like curling, cross country skiing and a little speed skating.

Labels:

Tuesday, February 07, 2006

Workshop Sunday March 5, 2006 at Cubberly

Please note: I have been passing out a postcard with the wrong date. The correct date for the workshop is Sunday, March 5th.

Instruction Manual for the Moon, #2 of 3
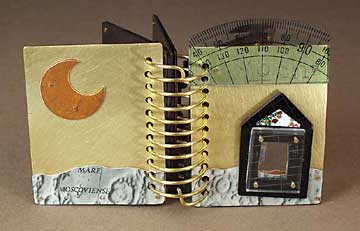
Above: Instruction Manual for the Moon, #2 of 3, 2006. Front and back covers. The covers are brass with found objects riveted to them.

On Sunday, March 5, 2006 I will be teaching a one-day workshop for the Palo Alto Art Center from 10 to 4. The class will meet at Cubberly in the jewelry studio. We will make a small artist's book out of copper clad plastic, which is a wonderful material for bookmaking. It's easy to cut and will take the same patinas as regular copper. You will learn to use the jeweler’s saw, rivets (or tiny nuts and bolts) and a few other hand tools. I will bring the copper clad plastic and an assortment of found objects. Students could bring found objects under about 3 inches that they would like to incorporate into a book. This is a great way to use some of those little things you have hoarded in your studio.

Instruction Manual for the Moon, #2 of 3
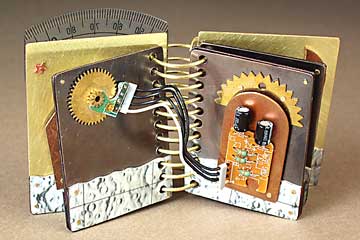
Above: Instruction Manual for the Moon, pages 4 and 5. The pages are copper clad plastic, with a liver of sulfur patina. The copper arch shape on the right was cut out with a jeweler's saw. Found objects were riveted to the pages. The moonscape across the bottom of the pages was made by gluing a moon map to copper clad plastic and cutting out the shapes I wanted.

My students have included assemblage artists, bookmakers, sculptors and people who are curious or adventurous. Click here to see books that students have made in my classes.

You can cut a huge variety of materials with a jeweler’s saw. These include plexiglas, Davey board, some plastics, masonite, copper clad plastics and of course, copper, brass and silver. The jeweler’s saw blade is so fine you can make a very sharp turn easily. You can add objects to altered board books with rivets or nuts and bolts. I could go on and on here. I love these tools and techniques.

Register online at the City of Palo Alto catalog page or call them at 650-463-4900.

Labels:

Sunday, February 05, 2006

News and Notes

News:
Work is going slowly on 7 Extinction Events. The tests for the landscaping didn’t work out well. I like the clarity of the foot impression in the clay, but it’s too fragile. So I made some little pads with footprints on them from Primo (very much like Fimo). I will have to incorporate them into the creek bed. The weather was so mild today, I spent the afternoon pulling a huge stack of weeds and pruning.

Notes:
  • The brush with the water in the handle referred to in the Image Transfer Accidents post is a Niji water brush. They look very useful. They are available here and here. (Thank you Diana.)

  • And thank you everyone who wrote to say they like the blog after I made my big announcement. All your comments were very valuable and appreciated.

    Labels:

  • Wednesday, February 01, 2006

    A Book About Art Inspired by Dreams

    Today the mailman brought me a wonderful book called Dreams 1900-2000: Science, Art and the Unconscious Mind, edited by Lynn Gamwell. It is divided into three sections. The first section contains 88 pages of essays about art and psychology. (At a glance they appear to be fairly scholarly, at least there are footnotes.)

    The second section is a Gallery of 152 color plates. Here's a sample image:
    Water Dream
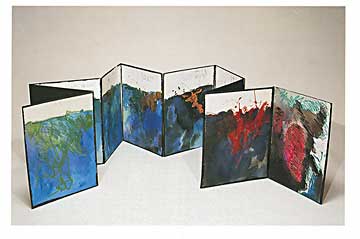
    (Donna Fenstermaker, Water Dream, 1990, artist’s book. “Along the top of the pages in this accordion fold book the artist wrote the text of a dream about swimming toward something in the water.”)

    The third section is titled “Dream Archive.” There are about 90 pages of smaller, black and white images of various artworks. The images include a few artist’s books, as well as painting, drawing, photography, dance and film.

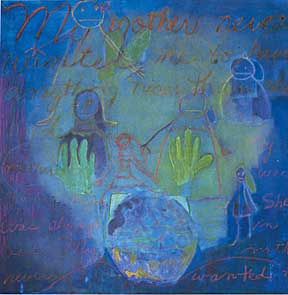
    My Mother Haunts My Dreams
    (Natalie Becker, My Mother Haunts My Dreams, 1998, oil on canvas.)

    This book is available at Hamilton Book for $12.95. (published at $50)

    Labels: ,