Sunday, January 29, 2006

Landscape for 7 Extinction Events
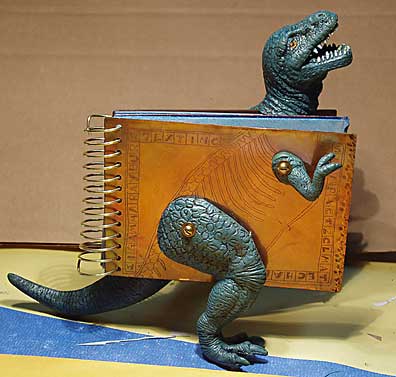
7 Extinction Events dinosaur book
The book for “7 Extinction Events” is almost together. I used brass wire for the spiral binding. There is a problem with the front leg. If I don’t tighten it much, it tends to pivot forward, making the fierce tyrannosaurus look like a sitting rabbit. When I tighten the nut more, the foot splays forward, making him look knock-kneed. Not good. So I’m taking some plastic off the inside of the leg to make a closer fit against the cover.

I also started on the scenery. There was a creek behind our house that I loved when I was a kid. It was a wonderful place, full of mud puppies, polliwogs and other fascinating stuff. On the other side of the creek was a barbed wire fence, and lots of cows in a field. My brother and sisters and I pretended we were pirates and western settlers, and I don't remember what else down there. There was a spot where I could lie on the grass and daydream, completely alone and happy. I’ll leave the cows out, of course, but I want that kind of creek for my dinosaur book.

There should be footprints and some ferns and palm trees. I found some great palm trees on the internet. There are good instructions for painting them here. Because I’ve never done this kind of thing before, I’m making some tests. I painted a trunk and a cluster of palm leaves with some Golden acrylic paints.
tests for dinosaur foot prints
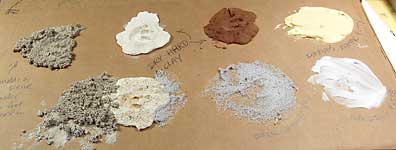
I also made a lot of samples for the ground that he’s walking on. I want the footprints to be fairly clear, they’re a reference to fossil foot prints. So I have 5 different materials that I’m testing for that.
Maquette for 7 Extinction Events
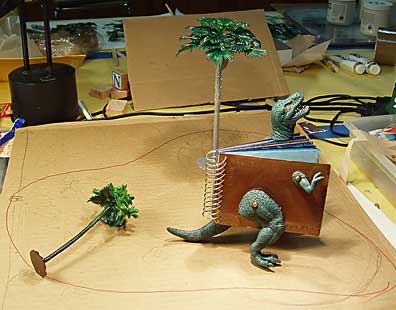
Here's a maquette of the whole set up to see how the parts look together. The red line is approximately the shape I’ll make for the base. When I like the shape and the relationship of the parts I’ll cut it out of plywood.

Looking at other people’s tests and maquettes is pretty boring, but I wanted examples to make my point. I think it’s very useful to make them when you’re doing something new. It’s a habit I learned when I was making jewelry. You don’t want to spend 20 hours on something just to mess it up in the last step.

Labels:

Wednesday, January 25, 2006

Economical Flex Shaft

Browsing through a recent Art Jewelry Magazine , I saw a review for an Economy Flex Shaft from Contenti. Here’s a quote from the review: “The motor runs smoothly . . . Other features such as the chuck, hand piece and shaft all appear equal in quality to similar products . . . For the student or dedicated hobbyist this flex shaft is an excellent value.”

Flex shaft machines are enclosed motors that hang above your worktable, with a shaft that comes down and drives the drill bit. The handpiece has jaws, like a household drill, that open and close with a chuck key. Flex shafts are convenient because they have a foot pedal, leaving both hands free. The contenti economy model costs $66, and has a 90 day return guarantee. The product number is 236-971. If you bought this you would also want a way to hang it. Contenti has a holder for flex shafts that screws to your work table for about $17, product number 236-012. (I hang my flex shaft from a large bicycle hook screwed into the rafters in my studio – just make sure it’s not going to fall.)

I have to say, I’m not affiliated with Contenti in any way, and don’t think I have ever ordered from them. I don’t know how long this flex shaft would last. They say they tested it under all-day-use with good results, but they don’t recommend it for that. To me, this means it’s not strong enough for a classroom or production jewelry shop. But it might be great for one person doing a variety of tasks. I am considering buying one for myself. I have an old flex shaft I bought used that has been altered, and I keep expecting it to break. During the classes I teach in my studio, it can get very hot.

Labels:

Sunday, January 22, 2006

Etching the book covers for 7 Extinction Events

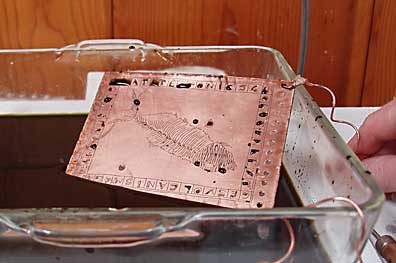
Tonight I’m etching the copper covers for 7 Extinction Events. I decided on nitric acid because I like the finished look so much. I use beeswax as a resist. It is gradually dissolved by the etchant along the edges of the book cover and the overall look is one of a very crudy piece of metal. If I leave the copper in the etch bath long enough all kinds of rough edges appear. To a jeweler this is a really bad thing, you want a smooth, clean bite, no undercuts and no blurring of the lines you have drawn in the wax. But for me, the rougher, the better.

I have to say here, I don’t use nitric acid with my students and don't really recommend it. It gives off fumes as it works, and it’s very caustic. I keep big boxes of baking soda around in case of a spill. Tiny splashes can make holes in your clothes, and of course, damage your skin and eyes. When I think the etching is done, I’ll soak it in a solution of water and baking soda to make sure the acid is neutralized. If you want to try etching, do some research on ferric chloride, a slightly safer option. But be sure to read all instructions and the MSDS (manufacturer's safety data sheets) before starting.

Etching the book covers for 7 Extinction Events

You can see the fish fossil I drew in the beeswax here. The nitric is very dark because it’s getting old. The black dots on the copper cover are little drops of the acid. You can also see the 20 gauge wire I use to suspend the copper in the etching bath. They make great handles. What you can’t see is the fan just above, pulling air out of my studio.

I also spent a lot of time today doing my volunteer work for Silicon Valley Open Studios. They needed some data plugged into a spreadsheet. It’s mindless, clerical work, the kind of thing I used to do as a job, and I am pretty good at it. Now my obligation is almost over. I won’t have to put the time in right before the Open Studios event, when I’m likely to be pretty crazy.

Labels:

Friday, January 20, 2006

Writing to explore ideas

Although visual artists express themselves best with art materials, I think writing is a good tool to include on your work table. Sometimes writing can help you to see clearly what matters the most in your life. This translates into a clearer vision in your art.

When I came home in December with photos of Christmas lights, I didn’t have a particular post in mind. I wanted to show the people on my mailing list a little bit of my world. I also wanted to use the blog to send them a holiday card.

Starting with the photos that I liked, I wrote about what’s nice about Christmas lights. In the beginning it was something like “I like these lights, they’re bright and shiny. There is a long tradition of lights or candles for holidays.”

The process of writing made me put all my thoughts in the computer. And one of them was the idea that I was I was a kid again when I looked at the lights. That was the idea I liked the best. I edited out things that seemed abstract, on the theory that you can read the abstract ideas other places. I wish I had kept my earlier drafts. They might be useful, or at least they would let me see how the process worked. If I had been writing on paper, which I usually do, I would have a couple of pages of messy writing, but I could find the original ideas.

There are books that tell you how to be in touch with your inner artist through writing. As far as I know, they all suggest “just writing.” This doesn’t work for me. I can write for hours about nothing. I do better if I have a place to start. (In this case: why do I like Christmas lights so much?) This isn’t writing as great literature, but writing to find out what really matters to you.

Here are a few general tips:
1. Have a notebook dedicated to these writings.
2. Don’t worry about spelling or punctuation.
3. Let things flow, follow a train of thought, no matter where it goes.
4. Say what you really think. No editing, no censoring at this stage.
5. Don’t ever let anyone else see your writings. If you need something for an artist’s statement you can extract the bits that work and polish them up.
6. Write about something that matters to you. Hopes, dreams or childhood memories could be good places to start. Or you could line up all the art works in your studio and write about what you see there. If something touches you, but you don’t know why, write about that. Be as personal as you can.
7. Don’t feel you have to keep to a schedule. When an idea strikes, write about it. To contradict myself: I do think it’s good to work at it some. Just don’t take the joy out of it by making it a job.

Labels:

Sunday, January 15, 2006

Coiling Tool, Part Two

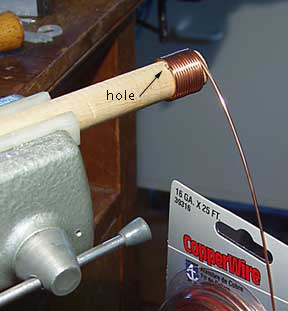
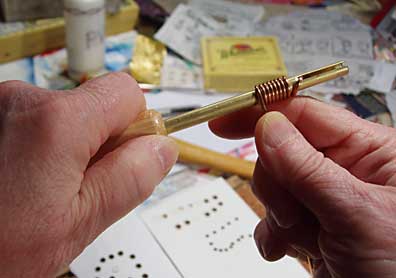
After ordering the coiling tools I mentioned in the coiling tool entry, I thought it would be easy to make one in any size I needed. Here’s how to make one: Take a 5/8 inch dowel, and drill a hole about 3/4 of an inch from the end with a #34 wire drill bit. The hole can go all the way through, or not, it doesn’t matter. You could also make one with a piece of brass tubing, which would be a little harder to drill. Of course you can vary the size of the dowel, and the hole size doesn't matter much, it just needs to accomodate the wire sizes you use.

Make a coiling tool by drilling a hole in a wooden dowel

To use the tool, hold the wooden handle in your dominant hand. (I am left handed.) Put the end of the wire in the hole in the dowel. Then you twist the dowel away from you, supporting the coil with the first finger of your other hand, and holding the wire between your thumb and first finger. There is a photo showing the hand position in the the coiling tool entry. Note that you can form the coil to your left or right. I think for most uses, going toward the long part of the dowel is better, you can make as many twists as you need.

I have been teaching my students to wrap their wire around a dowel held in a vise. I find it’s much more natural to twist the wire onto the coiling tool. The wire is easier to control and keep smooth, and it doesn't need to be pre-cut. The hole keeps the wire from slipping. To free the wire you’ll have to cut it next to the hole with a wire cutter. This is easy because the first wrap doesn’t lie flat against the dowel. The first few wraps will probably not be attractive, so make a few extra. If you wanted to make jump rings you could free the wire and then use the dowel to support the coil while you cut them.

I think the smaller diameter tools from Anima Designs might still be worth buying if you make lots of coils. Wooden dowels are easy to break in the thinner sizes. But if you need a larger size tool, it’s so easy to make your own.

Labels:

Wednesday, January 11, 2006

Image Transfer Accidents

The minute I saw Teresa’s feedback to “dirty up” the collage I wasn’t happy with, I thought it was brilliant.

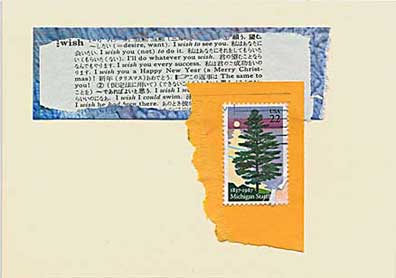
Wish you were here postcard
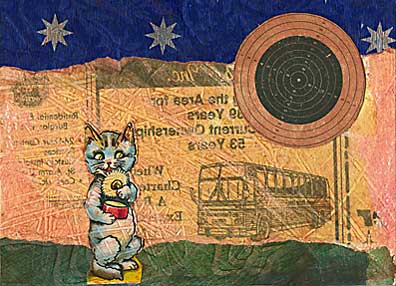
Here it is, before dirtying it up. I decided to first put a thin glaze on and scratch all over it to give it some texture and interest. Since I am using these as postcards, I flipped it over, while it was still wet on the front, and did the same to the back. The results were not what I imagined. When I flipped back over to the front again to let it dry, I realized the pressure from my brush handle, to make the scratches, had transferred ink from the phone book I use as scratch paper. So then I had a really dirty mess. I added more layers of paper, allowed it to dry, added another layer of glaze, and still thought it looked too cluttered. I peeled away parts of the collaged-on materials. I glued a part of the torn off papers back on. I added the woman and the strip of black paper I tore off the bottom of her. Another layer of acrylic glaze, more scratching.

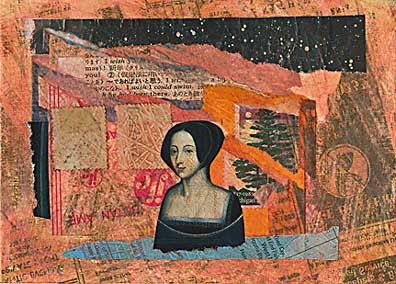
Woman and Tree postcard
Here’s how it looks now. I think I like it. I’m not sure it’s great, but it’s getting over-worked and it’s time to go on to something else. Thank you for your feedback, Teresa, it was very helpful.

I am very philosophical about the failures that I make. Mostly I think they need to get made so I can go on to another project. I also like to experiment in ways that I don’t usually work, so there are often flubs. Sometimes I find some new thing in them that I can use elsewhere. In the case of the postcard I had forgotten about a transfer demo that I saw Linda Tapscott do this past summer. I emailed her about my mistake. Here’s what she said:

“. . . once the Liquitex medium dries, you can go back with water (wet fingers) and rub off the paper. The ink should stick to the medium and the paper. If it isn't dry, you might get a mess, or if it gets too dry, sometimes it is hard to get the paper off. Ideally, there is a midpoint that works the best. It is hard to explain, and it will come with experience. “

When the image in the phone book transferred so clearly to my postcard I was completely surprised. I went ahead and did another transfer very quickly to see if I could repeat my “mistake.”

A kitty stands in front of a bus postcard
This one is clearly from the phone book. I am very impressed with how well the image transfers. The transfers I have seen that Linda did are moody and very atmospheric. I don’t remember any solid or “hard” lines in them. I believe she was using printouts from an inkjet printer.

Here’s how I did it: I brushed on a coat of acrylic mat medium. It was a fairly thin coat, enough to cover, but not thick. You can see where the stroke is thin, running diagonally through the bus. I laid the phone book page on the card immediately and rubbed it hard with a bone folder. Vigorous rubbing tears the phone book page pretty quickly, so I didn’t do it for more than 15 seconds. At that point the mat medium was already fairly dry. It was hard to peel the phone book page off. There were little bits of paper still adhered to the postcard, which I was able to rub away with my finger. The postcard is cut from Daniel Smith Murillo off-white. It has a texture and is about as heavy as lightweight museum board or heavy watercolor paper.

I want to thank everyone for the comments and emails. It’s very nice to get feedback. Feel free to contact me either way, through the comments system, or through my email. I'll add my email address to my links soon. Right now you can find my email address on my web site, on the "mailing list" page.

About the question “how do you stay creative while traveling?” Anonymous said “I carry a small sketchbook, watercolors, pencils, and a couple of those brushes with water in the handle in my purse at all times.” Is this a typo? Am I misunderstanding this? Are there brushes that hold water in their handles? They sound very useful. Please let me know.

Labels:

Sunday, January 08, 2006

7 Extinction Events: Progress Report

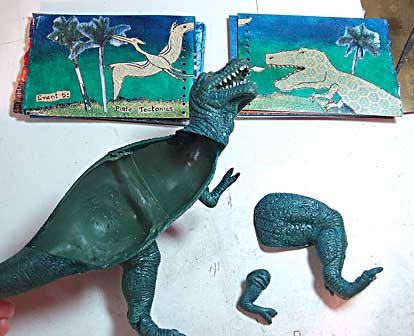
Not much art got done this weekend. Notice the third person here. I'd like to believe it isn’t my fault. I do have the collaged pages finished and I’m now coloring the dinosaur a little. He is a cheap plastic thing, (from ebay) and was a very ordinary grayish green. I put some blue-green acrylic paint on him and wiped it off, to bring out the detail. Tomorrow I’ll put a light brown on top. You can see I cut out a part of the body on one side to allow the book to sit inside the dinosaur. The arm and leg will go on the front cover.

Dinosaur and book pages

I used a jeweler’s saw to make the horizontal cuts in the dinosaur. It was an easy way to keep them fairly straight over the length of the cut. I am so used to it that I feel I have a lot of control. In this case I did make a jig that held the dinosaur in place by his feet so I could get a sort-of level cut. I wanted the book to be horizontal, which it isn’t. But it’s close enough for me. I did use a mat knife to cut the vertical cuts. This again seemed like the easiest way to get the long cut. There wasn’t enough room to maneuver the jeweler’s saw.

In general, jeweler’s saws are good for cutting lots of materials besides metal. I have cut museum board, Davey board, shells and many kinds of plastic and found objects with various degrees of success. Cutting Davey board is very easy, but it leaves a slight ragged edge that doesn’t show if the cut out areas are painted. Please note that shells when cut give off a dust that is harmful to your lungs. Be sure to wear a dust mask if you try this.

Labels:

Thursday, January 05, 2006

New Tool! Making Coils

I love tools. There is nothing more satisfying to me than to be able to go into my studio and find the right tool for the job. Metalworking requires some basic tools that aren’t that expensive. But once you’re hooked, you suddenly need three different jeweler’s saws, an assortment of hammers, files, and . . . the list goes on and on. Today I am supposed to be working on my dinosaur book, but instead I am playing with some new tools.

I saw this coiling tool at Anima Designs and had to have one. One thing I teach in my classes is how to make spiral bound books. We make the spiral by wrapping a wire around a dowel.
Here's an example of a spiral bound book.

Coil tool

This coiling tool is another way to make a spiral. I found it easy to control. It would work well for smaller coils. The largest size they sell is 3/8 inch, a little small for me. I use up to 3/4 inch dowels for my spiral bindings. But I’m thinking it might be possible to make larger coiling tools.

The instructions are very brief, but this method works well for me: Cut a piece of wire. You will have to guess how much is the right amount. Don't let your wire get kinks or little bends in it. Hold the wooden handle in your dominant hand. (I am left handed.) Put the end of the wire in the slot in the brass tubing. (on the right in the photo) Then you twist away from you, supporting the coil with the first finger and holding the wire between your thumb and first finger. The tool feels very natural to use and the wire feeds on smoothly. Try to get each new turn in the coil lying against the side of the previous one. Also try to keep the wire at a right angle to the brass tube of the coiling tool. If you want your coil spread out, wait until you slide it off the tool, then grab it by the two ends and pull gently. This way the distances between each coil will stay consistent.

Labels:

Sunday, January 01, 2006

January 1, 2006

New Year’s Eve parties don’t appeal to me much. Especially the aftermath, not getting enough sleep, not feeling well the next day. For me the New Year starts when the sun rises on January 1. It’s a nice time to think about what I have accomplished during the past year. I don’t make New Year’s resolutions, but I do like to look back and look ahead. I would like to make more art in the coming year. I would like to write down my dreams more often. I have been working on these projects since last summer, but this is a good time to remember my goals.

Sun Rise January 1, 2006

Some years this is a beautiful experience, others it’s a little somber. This year was a somber one. I got up around 6:30, got some hot breakfast, bundled up and went outside with a cup of tea to watch the sun come up at 7:24. The sun came up somewhere, but I didn’t see it. But that’s okay. The clouds are constantly changing and the early morning is peaceful. Looking at the sky sometimes makes me feel as if I expand into it. This is hard to put into clear words, but I feel my heart get huge.

Sun Rise January 1, 2005

This is January 1, 2005. It was very different experience. Some years I see lots of birds and the neighbor’s cats stroll or slink by, depending on the cat. Happy New Year! I hope it's all you hope and resolve to be.

Labels: