Sunday, June 04, 2006

You can always cover it up


This little box had a few splatters of white paint on it. Can you tell which ones they are? I have been meaning to put stars all over this box for a long time. This past week I didn't get much art done, but I did fix this box, and another one like it.


Here's a quick scan of one of the books that goes with the box. I originally made an edition of 9, each with it's own box. There were two left. I sold one book during Open Studios. The woman who bought it asked me to collage on the box, so I decided to do both boxes at the same time. When they were done, I gave her the choice of either box for her book. She liked them so much she decided she needed both books. So even though I didn't have much time in the studio, I did get a nice sense of accomplishment.

Labels:

Wednesday, January 11, 2006

Image Transfer Accidents

The minute I saw Teresa’s feedback to “dirty up” the collage I wasn’t happy with, I thought it was brilliant.

Wish you were here postcard
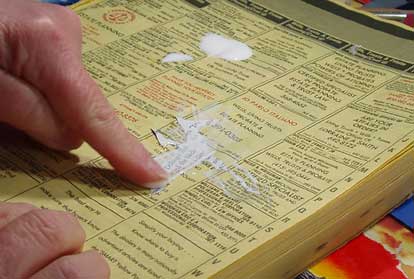
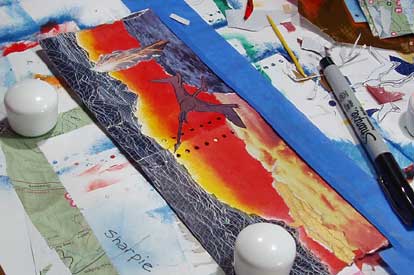
Here it is, before dirtying it up. I decided to first put a thin glaze on and scratch all over it to give it some texture and interest. Since I am using these as postcards, I flipped it over, while it was still wet on the front, and did the same to the back. The results were not what I imagined. When I flipped back over to the front again to let it dry, I realized the pressure from my brush handle, to make the scratches, had transferred ink from the phone book I use as scratch paper. So then I had a really dirty mess. I added more layers of paper, allowed it to dry, added another layer of glaze, and still thought it looked too cluttered. I peeled away parts of the collaged-on materials. I glued a part of the torn off papers back on. I added the woman and the strip of black paper I tore off the bottom of her. Another layer of acrylic glaze, more scratching.

Woman and Tree postcard
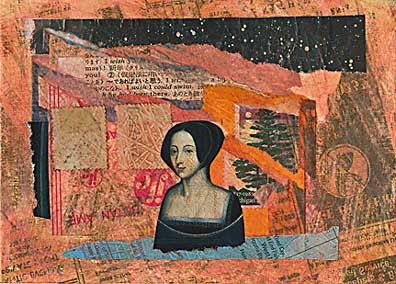
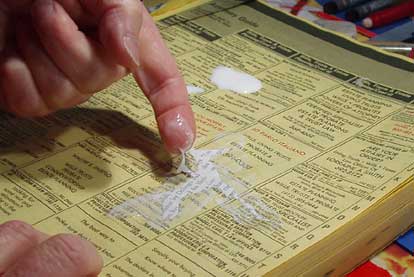
Here’s how it looks now. I think I like it. I’m not sure it’s great, but it’s getting over-worked and it’s time to go on to something else. Thank you for your feedback, Teresa, it was very helpful.

I am very philosophical about the failures that I make. Mostly I think they need to get made so I can go on to another project. I also like to experiment in ways that I don’t usually work, so there are often flubs. Sometimes I find some new thing in them that I can use elsewhere. In the case of the postcard I had forgotten about a transfer demo that I saw Linda Tapscott do this past summer. I emailed her about my mistake. Here’s what she said:

“. . . once the Liquitex medium dries, you can go back with water (wet fingers) and rub off the paper. The ink should stick to the medium and the paper. If it isn't dry, you might get a mess, or if it gets too dry, sometimes it is hard to get the paper off. Ideally, there is a midpoint that works the best. It is hard to explain, and it will come with experience. “

When the image in the phone book transferred so clearly to my postcard I was completely surprised. I went ahead and did another transfer very quickly to see if I could repeat my “mistake.”

A kitty stands in front of a bus postcard
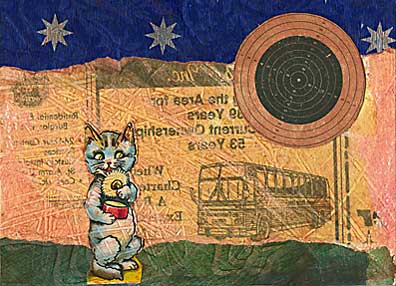
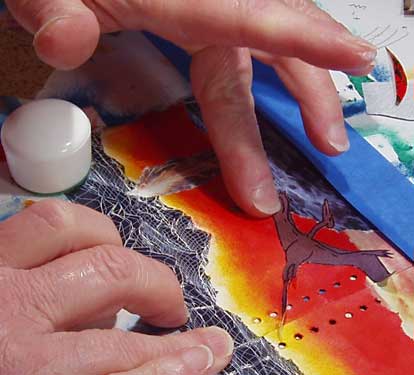
This one is clearly from the phone book. I am very impressed with how well the image transfers. The transfers I have seen that Linda did are moody and very atmospheric. I don’t remember any solid or “hard” lines in them. I believe she was using printouts from an inkjet printer.

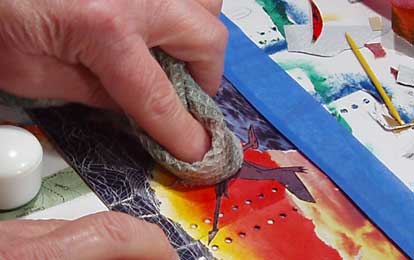
Here’s how I did it: I brushed on a coat of acrylic mat medium. It was a fairly thin coat, enough to cover, but not thick. You can see where the stroke is thin, running diagonally through the bus. I laid the phone book page on the card immediately and rubbed it hard with a bone folder. Vigorous rubbing tears the phone book page pretty quickly, so I didn’t do it for more than 15 seconds. At that point the mat medium was already fairly dry. It was hard to peel the phone book page off. There were little bits of paper still adhered to the postcard, which I was able to rub away with my finger. The postcard is cut from Daniel Smith Murillo off-white. It has a texture and is about as heavy as lightweight museum board or heavy watercolor paper.

I want to thank everyone for the comments and emails. It’s very nice to get feedback. Feel free to contact me either way, through the comments system, or through my email. I'll add my email address to my links soon. Right now you can find my email address on my web site, on the "mailing list" page.

About the question “how do you stay creative while traveling?” Anonymous said “I carry a small sketchbook, watercolors, pencils, and a couple of those brushes with water in the handle in my purse at all times.” Is this a typo? Am I misunderstanding this? Are there brushes that hold water in their handles? They sound very useful. Please let me know.

Labels:

Friday, December 09, 2005

Collage Demo: Part Two

On the pair of pages I’m working on I have already collaged on the ground, sky, clouds and some fire that represents volcanoes. I drew a small pterodactyl on a photo of some rough ground from a magazine and cut it out. When I am sure of the position on the page, I make a few small pencil marks just UNDER the edge of the pterodactyl. When it is glued in place, the pencil marks will be covered.

Spreading PVA on the back of the pterodactyl

I put a dab of PVA on one corner of a phone book page and use my finger to apply it to the back of the pterodactyl. I try to keep the layer of PVA thin, so it doesn’t seep around the edges too much, but it needs to be thick enough to adhere well.

Lifting the pterodactyl with a fingernail

It’s tricky to pick up complicated shapes. Here I am using my fingernail. A palette knife also helps. I transfer the pterodactyl with glue on it to my book page and press it down. My scale is so small I can push air bubbles out with my finger.

Patting the pterodactyl down with a finger

I am pressing down the pterodactyl with my middle finger, you can still see the PVA on my first finger. I have a barely damp cloth and a dry cloth nearby to wipe my fingers if needed. Often a bit of PVA seeps out from the edge and needs to be cleaned up.

Patting away excess glue with damp cloth

I take the damp cloth and blot off that area quickly, then blot it with a dry cloth. If you’re using magazine images or other soft papers, don’t let them get too damp and don’t rub them. The book page is barely damp at this point. If I still see PVA around the edge of the bit of paper I blot it with my clean fingertip. This either removes it or makes it matt so it doesn’t show.


There are other tutorials on my web site.

Thank you Jim for taking the photos.

Labels: ,

Sunday, December 04, 2005

Collage Demo: Part One

The Materials

I started doing collage when I lived near downtown San Jose and walked to San Jose State. There was a goldmine on the streets. I found bits of personal letters, photos, wrappers of all kinds and lots of other good stuff. It seemed to me that there were secret messages lying all over the sidewalk and I wanted to put these secrets into my art.

There are many different ways to do collage. Mine has evolved over the years in response to the materials I had and the effect I was trying to achieve. It works well for very small-scale images. Most of my artist’s books are under 5 inches in any direction. I love small-scale work. It’s intimate and works great in artist’s books, my favorite way to work in paper.

materials used for collage

In the image above, you can see in the back my stash of small bits of paper in the drawers. In the middle: (left to right) phone book, small and large bottles of Lineco PVA, damp cloth in tofu tub, dry cloth. In the front: (left to right) some fabric brushes I’m testing, scissors, exacto knife, the stack of pages is the text block for my new book, with some clip-on magnifiers on top, acrylic paints and sewing weights. This image enlarges to show more detail.

I use polyvinyl acetate for glue. (Usually called PVA) This is similar to Elmer’s glue, but better quality. I buy Lineco brand, from a local store, Maggie's , or from Daniel Smith. It is a neutral ph adhesive that leaves my papers looking unchanged by the glue. It will dry up if left uncovered, so I pour some into a smaller container to work from.

There are many opinions about the best adhesive for collage and each product has its staunch fans. Each group claims its favorite glue is the only correct thing to use. I’m not a chemist, so I don’t know about any of this. To my knowledge PVA holds the best, acrylic gel mediums are next, and acrylic mediums have the least holding strength. I have used several different glues in one project with good results. Personally I would say it’s good to try them all and then go with what ever works for your style and personal preferences.

For collage materials I have boxes of old magazines, books that I can cut up, scraps of interesting papers, piles of maps and drawers of small bits of paper I have been collecting for years. I like to work on good quality watercolor paper. Usually I use Arches Hot Press, which is very smooth. I find that the rougher papers have too much texture for small-scale work. I use 90 lb papers for pages I want to fold and sew into books, and 300 lb for pages I treat as boards or for covers. Museum board is also a good book cover material. You can purchase good papers in art supply stores or online at Daniel Smith or Mister Art.

I like to use Golden acrylics to paint my book pages before I start the collage. I do have some Liquetex paints because they are easier to find locally.

I also keep worn out dish clothes in my studio. Because I get the glue on my hands, I like to work with a damp cloth and a dry cloth nearby. A tofu or yogurt tub is handy to keep the damp cloth in so your table doesn’t get wet.

Small scissors and a mat knife are important for cutting out delicate pieces of paper. You might also want some kind of magnifying glasses, colored pencils, and all your other usual art supplies. I also use sewing weights to hold down my pages as I work. If the paper is too buckled for the weights to hold, I might improvise something with tape instead. I use old phone books as pads of scrap paper. Whatever you use, if it has print, make sure it won’t run when wet.

There are other tutorials on my web site.

Labels: ,