Wednesday, July 11, 2007

Simple boxes for books and digital caliper


Don Drake gave a fantastic box making demo at a BABA meeting a few weeks ago. Over many years he has developed a simple box plan that is quick and easy, as boxes go. His instruction was so clear my demo box came out impressively good. In the photo above I haven't glued down the bottom liner yet. After watching him measure box parts with a caliper, I decided I needed one.


My caliper came from micromark sometime last week. I don't usually buy complicated tools, preferring the simplest approach possible to anything. When I am measuring that usually means lining two pieces up and making the second match the first. But the digital caliper will switch from inches to millimeters with the push of a button. I don't think these are entirely accurate. In the photo above the dime I measured is between .700 inches and .7025 inches, depending on some mysterious force in the universe. But it's plenty accurate for my needs.

If you're considering buying a caliper, check out this Wikipedia article. It says the dial calipers last longer.

Labels: ,

Monday, August 28, 2006

The Last Class of Summer


Above: Fish book by Giles Gunn, 2006. See the inside of the book here.

The class in my studio ended today. It was a wonderful group. Every person brought something interesting and valuable to the group. I really enjoyed this class a lot. Sometimes you just connect with people. I am a little sad that it has ended. There were different approaches, different ideas, different problems to solve. That makes it interesting for me. Unfortunately, I didn't have time to take photos of the work. I do have photos from my last class at Cubberley on my web site now.

I still struggle with how much to cover in a class. I want people to go home with a set of basic skills they can use with simple tools. I often feel I'm cramming too much in. I keep cutting things out, and then thinking of another technique that would be fun to cover. Maybe I need to start offering an advanced class once a year. I usually end up feeling things went well, but could have been improved. This time was no exception.

Labels:

Saturday, June 17, 2006

Metal Techniques Class in Palo Alto


Above: "It's not broken" ©2005, 7 x 6.5 x 1.5 inches. Found objects, fabricated. I made this altar for a Bay Area Book Artists concept exchange. I used wire, nuts and bolts, and glue to attach things.

I will be teaching a class in the Cubberley Jewelry Studio in Palo Alto, beginning July 12. We will make metal books using jewelry tools and techniques.

The class will cover basic metalworking tools, including:
Shears – used to cut simple shapes from some materials
Jeweler’s saw – used to cut intricate shapes from most materials
Files – handy for cleaning up edges of metal
Flex shaft – good for drilling small holes for rivets or tiny nuts and bolts

And cold connection techniques, including:
Three styles of rivets (tube, ear post and wire)
Small nuts and bolts
Jump ring bindings
Spiral bindings

Also:
Patinas for copper
Textures on metals

With these tools you can cut shapes from metals, book board and plastic. These shapes can be used as book pages or they can be attached to metal, plastic or book board pages. You can also attach many found objects to your pages using the cold connection technques.

The student gallery on my web site has work by previous workshop students.

The class meets Wednesdays, July 12 to August 9, 7 to 10 pm. We will meet in the jewelry studio at Cubberley, 4000 Middlefield Road, Palo Alto, room # F-7. Minimum of 8, maximum of 15 people. $96 for Palo Alto residents, $110 for others, $15 materials fee. Go here to download the adult schedule as a pdf, and for information on registering. You can also download the adult classes section by going to the workshops page on my website.

Labels:

Monday, March 13, 2006

Workshop Report, Part Two

In Part One I talked about the workshop. Here I'll talk about some of the books the students made.

We used copper clad plastic for the pages and the covers of the books. This is a material used to make pc boards. It is a thin sheet of plastic on the inside, covered on both the front and back with a thin layer of copper. It takes a patina like regular copper. It is also much easier to cut with a jeweler's saw than copper, which starts people out with an advantage. Before the workshop I cut out the covers and three pages for each book. Each book is 2 inches high. I also drilled holes in the books so they could be bound with two jump rings. I wanted to save them some time so they could get right to the fun part. Six hours isn't long enough to really get involved with a project.

The finished books were all very different. They were all the same size, the same material, and started with the same number of pages. But everyone had different ideas about how to embellish the books.

For some reason Blogger won't let me post photos right now. I have no idea what's going on. There are links to each image that I talk about. There are also more photos of student's books on my web site in the Student Gallery.

Viviane cut a page with a shape that came up out of her book to echo a cherub. She also added paper pages between the copper ones.

Patty used the jeweler's saw to cut out a wave shape and a fish for her cover. She also used bead chain instead of jump rings to bind her book.

Rosine took it to heart when I said books don't have to close and added metal screening pages with things wired on.

Some people are good at coming into a workshop and making a finished product that they are happy with. Others spend their time learning the techniques, but don't have a finished thing to take home. I think either way works fine. I am the second type of person. It takes me a long time to take in the ideas in a way that I can relate to in my work. So when I'm teaching, I try to make sure people get the techniques, and don't worry about the finished products too much. This is one area where on-going classes are better than workshops. There is more time to develop ideas.

Next: I need to clean up the huge mess on my worktable and start taking photos of 7 Extinction Events. (I said that last week, too, didn't I?)

Labels:

Saturday, March 11, 2006

Workshop Report, Part One

The workshop went well. It was a very nice group of 10 people. Four people drove down from Sacramento for the day. How flattering! Some had metalworking skills, some didn't. I wish there had been more time to talk. One thing I like about a class that meets weekly is being able to get to know people. I like to know what media they usually work in and what they want to do with the metalworking skills.


Book making supplies

Here you can see some of the raw materials for the books.

Looking for the right part

Here is one of the people from Sacramento, looking for the right part.

The jeweler's saw is hard for most people at first. I was impressed with how well this group did. And the little ear post rivets require some patience. This group became rivet queens pretty quickly. They were amazing.

Working

I usually come away from teaching a class feeling inspired to get back into the studio. I get to see art through other people’s eyes. In the studio my mind thinks along a track, with occasional derailments, which might lead to good ideas. It's really fun to get it derailed by watching other people work on their art.

Next: Workshop Report, Part Two. A few shots of the books made in the workshop.

Labels:

Tuesday, February 07, 2006

Workshop Sunday March 5, 2006 at Cubberly

Please note: I have been passing out a postcard with the wrong date. The correct date for the workshop is Sunday, March 5th.

Instruction Manual for the Moon, #2 of 3
Above: Instruction Manual for the Moon, #2 of 3, 2006. Front and back covers. The covers are brass with found objects riveted to them.

On Sunday, March 5, 2006 I will be teaching a one-day workshop for the Palo Alto Art Center from 10 to 4. The class will meet at Cubberly in the jewelry studio. We will make a small artist's book out of copper clad plastic, which is a wonderful material for bookmaking. It's easy to cut and will take the same patinas as regular copper. You will learn to use the jeweler’s saw, rivets (or tiny nuts and bolts) and a few other hand tools. I will bring the copper clad plastic and an assortment of found objects. Students could bring found objects under about 3 inches that they would like to incorporate into a book. This is a great way to use some of those little things you have hoarded in your studio.

Instruction Manual for the Moon, #2 of 3
Above: Instruction Manual for the Moon, pages 4 and 5. The pages are copper clad plastic, with a liver of sulfur patina. The copper arch shape on the right was cut out with a jeweler's saw. Found objects were riveted to the pages. The moonscape across the bottom of the pages was made by gluing a moon map to copper clad plastic and cutting out the shapes I wanted.

My students have included assemblage artists, bookmakers, sculptors and people who are curious or adventurous. Click here to see books that students have made in my classes.

You can cut a huge variety of materials with a jeweler’s saw. These include plexiglas, Davey board, some plastics, masonite, copper clad plastics and of course, copper, brass and silver. The jeweler’s saw blade is so fine you can make a very sharp turn easily. You can add objects to altered board books with rivets or nuts and bolts. I could go on and on here. I love these tools and techniques.

Register online at the City of Palo Alto catalog page or call them at 650-463-4900.

Labels:

Friday, December 09, 2005

Collage Demo: Part Two

On the pair of pages I’m working on I have already collaged on the ground, sky, clouds and some fire that represents volcanoes. I drew a small pterodactyl on a photo of some rough ground from a magazine and cut it out. When I am sure of the position on the page, I make a few small pencil marks just UNDER the edge of the pterodactyl. When it is glued in place, the pencil marks will be covered.

Spreading PVA on the back of the pterodactyl

I put a dab of PVA on one corner of a phone book page and use my finger to apply it to the back of the pterodactyl. I try to keep the layer of PVA thin, so it doesn’t seep around the edges too much, but it needs to be thick enough to adhere well.

Lifting the pterodactyl with a fingernail

It’s tricky to pick up complicated shapes. Here I am using my fingernail. A palette knife also helps. I transfer the pterodactyl with glue on it to my book page and press it down. My scale is so small I can push air bubbles out with my finger.

Patting the pterodactyl down with a finger

I am pressing down the pterodactyl with my middle finger, you can still see the PVA on my first finger. I have a barely damp cloth and a dry cloth nearby to wipe my fingers if needed. Often a bit of PVA seeps out from the edge and needs to be cleaned up.

Patting away excess glue with damp cloth

I take the damp cloth and blot off that area quickly, then blot it with a dry cloth. If you’re using magazine images or other soft papers, don’t let them get too damp and don’t rub them. The book page is barely damp at this point. If I still see PVA around the edge of the bit of paper I blot it with my clean fingertip. This either removes it or makes it matt so it doesn’t show.


There are other tutorials on my web site.

Thank you Jim for taking the photos.

Labels: ,

Sunday, December 04, 2005

Collage Demo: Part One

The Materials

I started doing collage when I lived near downtown San Jose and walked to San Jose State. There was a goldmine on the streets. I found bits of personal letters, photos, wrappers of all kinds and lots of other good stuff. It seemed to me that there were secret messages lying all over the sidewalk and I wanted to put these secrets into my art.

There are many different ways to do collage. Mine has evolved over the years in response to the materials I had and the effect I was trying to achieve. It works well for very small-scale images. Most of my artist’s books are under 5 inches in any direction. I love small-scale work. It’s intimate and works great in artist’s books, my favorite way to work in paper.

materials used for collage

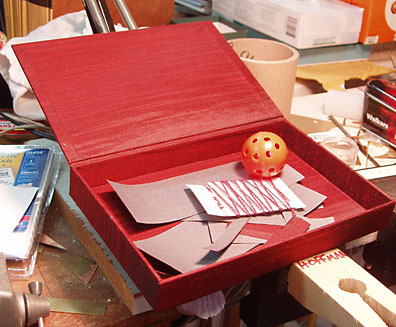
In the image above, you can see in the back my stash of small bits of paper in the drawers. In the middle: (left to right) phone book, small and large bottles of Lineco PVA, damp cloth in tofu tub, dry cloth. In the front: (left to right) some fabric brushes I’m testing, scissors, exacto knife, the stack of pages is the text block for my new book, with some clip-on magnifiers on top, acrylic paints and sewing weights. This image enlarges to show more detail.

I use polyvinyl acetate for glue. (Usually called PVA) This is similar to Elmer’s glue, but better quality. I buy Lineco brand, from a local store, Maggie's , or from Daniel Smith. It is a neutral ph adhesive that leaves my papers looking unchanged by the glue. It will dry up if left uncovered, so I pour some into a smaller container to work from.

There are many opinions about the best adhesive for collage and each product has its staunch fans. Each group claims its favorite glue is the only correct thing to use. I’m not a chemist, so I don’t know about any of this. To my knowledge PVA holds the best, acrylic gel mediums are next, and acrylic mediums have the least holding strength. I have used several different glues in one project with good results. Personally I would say it’s good to try them all and then go with what ever works for your style and personal preferences.

For collage materials I have boxes of old magazines, books that I can cut up, scraps of interesting papers, piles of maps and drawers of small bits of paper I have been collecting for years. I like to work on good quality watercolor paper. Usually I use Arches Hot Press, which is very smooth. I find that the rougher papers have too much texture for small-scale work. I use 90 lb papers for pages I want to fold and sew into books, and 300 lb for pages I treat as boards or for covers. Museum board is also a good book cover material. You can purchase good papers in art supply stores or online at Daniel Smith or Mister Art.

I like to use Golden acrylics to paint my book pages before I start the collage. I do have some Liquetex paints because they are easier to find locally.

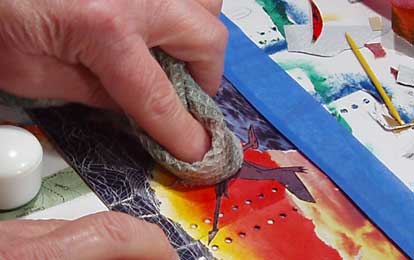
I also keep worn out dish clothes in my studio. Because I get the glue on my hands, I like to work with a damp cloth and a dry cloth nearby. A tofu or yogurt tub is handy to keep the damp cloth in so your table doesn’t get wet.

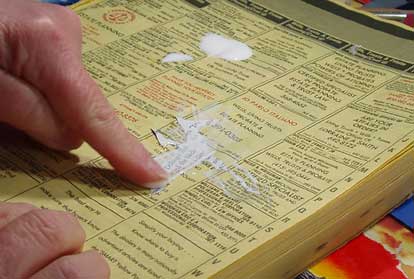
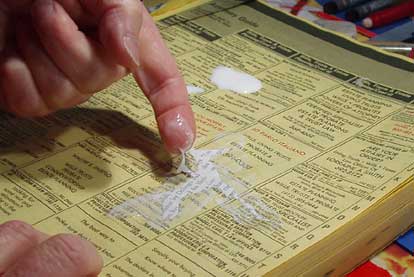
Small scissors and a mat knife are important for cutting out delicate pieces of paper. You might also want some kind of magnifying glasses, colored pencils, and all your other usual art supplies. I also use sewing weights to hold down my pages as I work. If the paper is too buckled for the weights to hold, I might improvise something with tape instead. I use old phone books as pads of scrap paper. Whatever you use, if it has print, make sure it won’t run when wet.

There are other tutorials on my web site.

Labels: ,