Sunday, April 05, 2009

Making a brass box for a pinhole camera


I'm working on this box. It's 3 inches tall and 2.25 inches on each side. At first I couldn't get enough heat from my acetylene/air torch to solder on the bottom.


Here's the solution. The walls and base are solderite pads. I can build a lot of heat around the back left corner of the brass box.

Labels:

Monday, August 04, 2008

In my Dreams We travel in Boats


In my Dreams We travel in Boats ©2008 6.5 x 3.25 x 1.75 closed. The open book is about 17 inches long.


There is no real front or back in this book. It is based on dreams I have had about boats. They are large, simple boats, like rowboats with no oars, or lifeboats. They are always white. The web page includes text from parts of the dreams. There are three pages of notes and photos showing the stages of construction.

Labels: ,

Thursday, December 20, 2007

Ursa Major


Ursa Major, Staedtler MasterCarve carving block, image is 3 x 4 inches. This is the most complicated eraser carving I have done. I ground the point of a large needle flat and polished it to make a small carving tool for the detail around the stars and the eye. You can a larger version on my flickr page.

Searching the web to find stars charts to use for this carving was fascinating. The asterism (the big dipper part of the constellation) has different images associated with it in different cultures.

My favorite is from Keith Snyder's site. "When a Lakota dies, his or her material body returns to grandmother sacred below. The spirit rises up into the spirit world, returning to grandfather sacred above. It is important to note that while the spirit travels from a material to a spiritual dimension of existance, both of these realms are called "sacred". Formerly, there was a star in the center of the Big Dipper. Now, however, there is an opening or hole where the star was located. The Wenagi comes up into the spiritual world through this hole which was made when Fallen Star's mother dug out the first wild turnip."

From this web site:
"Nearly every culture on Earth has seen patterns in the stars. But, not surprisingly, very few have seen the same patterns. Take, for example, the Big Dipper, perhaps the most recognizable star pattern in the sky. The Big Dipper is not actually a constellation itself, but is part of a larger pattern known to the Greeks as Ursa Major, the Great Bear. The seven stars of the Big Dipper have inspired many stories, perhaps because they are bright and located so near the north celestial pole, around which the stars rotate during the course of the night. But not everyone calls it a Dipper. The British call it a Plough. In Southern France, it is a Saucepan. The Skidi Pawnee Indians saw a stretcher on which a sick man was carried. To the ancient Maya, it was a mythological parrot named Seven Macaw. Hindu sky lore called it the Seven Rishis, or Wise Men. To the early Egyptians, it was the thigh and leg of a bull. The ancient Chinese thought of it as a special chariot for the Emperor of the Heaven or some other celestial bureaucrat. For the Micmac Indians of Canada's Maritime Provinces, along with several other North American Indian tribes, the bowl of the Big Dipper was a bear, and the stars in the handle represented hunters tracking the bear. And in the nineteenth century, the Big Dipper became a symbol of freedom for runaway slaves, who "followed the Drinking Gourd" to the northern states."

More here. (Skim down to "The Big Dipper in other Cultures."

Labels: ,

Sunday, July 15, 2007

Repairs Done


The little band on the handle of the lorgnette is my final repair. I am tired, and can't judge how it looks. I think it's okay, but I have been wrong in the past. Tomorrow I will ship it to the Grace Hudson Museum. The curators, Marvin and Colleen Schenck will make the decision. I'm glad it's out of my hands.


I tried two other solutions to repair the lorgnette. The first involved cutting a piece of tubing the long way and riveting it in place. I gave up on this when I realized I wouldn't be able to keep the two parts lined up, and there would be two seams. This second, or actually third try is a fairly simple band. It wraps around the kelp handle and is riveted in place on the back. I have some reservations. The seam on the back looks huge to me. I couldn't solder it, so it isn't really closed completely.

When I finished the repair today, I didn't know what to do with myself. I feel like I need to relax, but I just paced around. I don't always have this much of a problem when I finish a project. Usually there is a little let down, but I always have new ideas and plenty of other things to do. Right now I feel blank and tense. Tomorrow will be better.

Labels:

Friday, July 13, 2007

Repairs


I will have some work in the Metal Works North exhibit at the Grace Hudson Museum in Ukiah, California, July 21 to October 14th. The opening, which I do plan to attend, is on July 21st, 5 to 7:30 pm. The announcement is very nice. Click here to download the front of the announcement and here for the back.

When I got the work out, I was very embarrassed to notice a crack in the handle of the Lorgnette for a Fish Goddess. The handle is kelp, over a brass rod. I imagine the kelp shrank and cracked over the years. I think I can see it in an old photo, I just didn't pay attention to those details. The curators, Marvin and Colleen Schenck thought it would show under the lighting they use for the exhibits, (and I agree completely.) We talked about possible repairs, and they took Spectacles for a Fish Goddess instead. But if I get the repair done, and get the finished piece to the museum by this coming Tuesday, it will still be in the show. Of course, that's what I want to do. With my brother-in-law's recent death, the memorial at our house this past Sunday, and the stuff that has piled up in the last month, I didn't know if I can do it.

I have spent the last three days trying to figure out what to do. I started to make a small piece of tubing that would cover the crack, then decided it would be hard to get it on the handle with both parts lined up correctly. So I decided on a larger piece of brass that would both support the glasses section a little more, and cover the crack. Today, when I finished etching the brass piece and held it up to the lorgnette, I thought it looked terrible. I took the photo above as a way to look at the composition. It looks too busy to me, the brass piece looks so out of place. I will have to try again tomorrow, but for now, I'm off to read for the rest of the evening. Oh, and do the dinner dishes, scoop kitty litter, and take out the compost. I am feeling rather sorry for myself at the moment. Hopefully I'll have a brilliant idea in the middle of the night.

Labels:

Friday, April 13, 2007

Working on the DFD


More progress on the Dream Focusing Device. Here I have the parts ready to be assembled. I am ready to rivet the hinge in place. To do that I need to temporarily hold all the parts together. I drill small holes where I intend to put rivets, then put temporary rivets in place, using ear posts. The blue painter's tape holds the rivets until I remove it. The clamps are my "third hands," holding everything securely while I mark and drill the holes. Tonight I am tired and getting clumsy, so I had to stop.

There is a larger image at Flickr. (Click on the "all sizes" button above this image to see the largest version.)

Labels:

Wednesday, April 04, 2007

Pop quiz: What does gardening have to do with art??


What does the picture above have to do with the one below?


I have been spending a lot of time in the garden for the last month. Because of that, progress is slow on the Dream Focusing Device. But I feel so alive and connected to the natural world when I garden. The content of my work mostly is about death or some kind of loss. And nature can teach us a lot about death. I feel comforted to see that the old vegetable plants I throw in the compost bin in October become mulch that nourishes new plants the following spring. Life flows in a cycle that is both sad, because we lose those we love, and reassuring, because life does go on.

Here are the details, if you are also a gardener: In the foreground at the right are raspberries and some perennials. The next bed contains poppies on the left, a tiny tomato plant, and snow peas to the right of the tomato. Further back are two parsley plants, the remnants of our winter garden. And, of course, a lovely orange tree in the background.

Oh, and the other details: The Dream Focusing Device is getting close to being done. I have the hinge ready to attach. Because the Device folds for storage, I had a leg that holds up the back part. But it wasn't working well, so I will have to re-engineer that. And I need a little decorative part for the front. I can see it done in my mind, so I am very excited to work on it.

Labels: ,

Sunday, December 17, 2006

Parts for Dream Focusing Device


Parts for Dream Focusing Device
Originally uploaded by bertmac.
Here are the brass parts for the Dream Focusing Device. They need to be really clean so I can put the resist on for etching. Today I sanded them thoroughly. I also made a new top for the receiver. It's the one in the center back. I form the side wall, which is basically a wide bracelet, then I solder that seam. Then I place it on a base which is larger than the oval, and solder the side wall to the base. There are more precise ways to make boxes, but I'm not patient enough. This seems (pun!) to work fine. I need to trim the extra parts of the base away now, and file the edges round. The old top, which is at the lower right, has a small gap in the back seam. It was bothering me, so I figured I had to try to make a better one.

I haven't been in the studio much. Mostly 40 minutes here and there. But it does add up. I can "see" this thing finished now, and am enjoying working on it. We will have a week off later this month, so I'm hoping for some significant progress.

Labels:

Monday, November 13, 2006

I receive you loud and clear!

Here is the next stage of the receiver transmitter for the dreaming focusing device. The cover is on the left, the body is on the right. You can see the vertical openings where the focused dream comes in. And the little holes in the center divider will allow the selected dream type into the transmitter side.

I have to clean these pieces up and dip them in hot beeswax. Next I will draw designs on the parts and etch them in ferric chloride. I am waiting for a clear day to do that. In the meantime I need to make the dial for the top, which will allow the user to chose the type of dream. I am thinking the selection should be: fish, bird, bear, star and moon. I would like to have any and all of those dreams.

What you can't see here is that I am having to learn to solder (high temperature brazing, using an acetylene torch), on a different scale. This 2.5 inch long box is much harder to solder than the little things I'm used to. In fact last week I described it as "4 inches long." It feels huge to me. I spent ages with the torch trying to get the body hot enough. Finally, when it was done, the seam looked pretty good. I thought the cover would be much easier. Unfortunately it took me three tries to get the whole cover seam soldered. But I am learning. I got the center divider right on the first try.

Labels:

Friday, November 03, 2006

Now where did I put that?


Dream focusing device
Originally uploaded by bertmac.
This is an old project I am resurrecting. It's a dream focusing device. (click on the image to see a larger version and a little more information.) It has been lying around unfinished since 1997. I found about 20 sketches for it, and the associated parts, in three different sketch books. Not that I am organized about these things. I usually have several "active" sketchbooks at any given time. I am missing an important part. I stayed up late one night to draw the path of the moon on a piece of paper so I could make the shadow accurately. Now that paper is gone. But I think I can proceed without it.

I'm not sure about the actual title yet. Hopefully it will come to me. I think I have figured out how to focus the dreams, but I'm not clear yet on how to get them transmitted to the sleeper's brain. The in-progress receiver/transmitter is here.

It has been a crazy week, but I am getting a few hours in the studio here and there. Not much time for anything. I am realizing that either things will be chaotic or I will get some art done. Tough choice, because I feel stressed. Maybe that will pass.

Labels:

Friday, September 29, 2006

Brass pinhole camera


Brass pinhole camera
Originally uploaded by bertmac.
I am so excited about this project. I plan to make some tools and objects. What better tool than a pinhole camera? And I could use the resulting photos in collages.

This is my first test, to see how bad the light leaks are, whether the idea works at all.

Next I will add some feet, a shutter and maybe a viewfinder. I already have an idea for the next one. Click on the photo to see my flickr photostream. There are two photos taken with this camera, and a view of the camera open. There is also more information about the exposure times, etc.

Gotta go! I want to work on the base tonight.

Labels:

Sunday, September 24, 2006

I knew that!

". . . And truthfully, what could be more important for any of us - art makers or otherwise - than to make work that matters to us, work so important that we give up other things in our lives to do it?"

This sentence is on page one of "The View From the Studio Door" by Ted Orland. Didn't I know that? Why do I have to re-learn these things? What a timely reminder. I have been trying to work on the rock book, but there is no joy for me in this series of books, with the exception of the original dinosaur.


This is the seventh event, on page 14 of Seven Extinction Events.

Normally I love making art. It comes out of my dreams and personal mythology. It allows me to be connected with my spiritual life. When I'm working I forget time and feel totally involved with the object. This is not happening with these books.

I like to start with the pages. Sometimes I am illustrating a dream, a myth I made up or some random sentence from a book that has a personal significance to me. As I work, I know what to do next because there is a story in my head. If I'm on Mars, I need a desert landscape and some Egyptian ruins. If I am walking to a foreign city, I might be lost and need stars to guide me. As I work on the pages, I begin to get an idea for the cover. In this case, I was thinking "rock book, volcano book, fern book" to complete the landscape for the dinosaur book. I knew there wasn't any content, but I didn't think ahead to the consequences. (I'm not doing "show the plants of the late Cretaceous." That is content, but it has no pull for me. I want to make art for emotional and spiritual satisfaction, not for the visual joke.)

I need to either find some content that I can believe in for these books, or set the project aside. It's hard to think about this. I have spent a lot of time on it. Does it make sense to go on and finish enough books to show them together in some way? Or should I cut my losses now and start something I care about on an emotional level? Maybe the question comes down to "do I want to please my audience, or do I want to please myself." I may be able to get these books in shows or published somewhere, but will I be proud of them?

Labels: ,

Thursday, August 24, 2006

Did you forget!??

No, I haven't forgotten about this blog! I'm teaching a class in my studio on Sundays right now, and my schedule is weird. I keep thinking Thursday is Saturday, etc. You know. This coming Sunday will be the last meeting, and I'm a little sad about it. It's a very nice group of people.


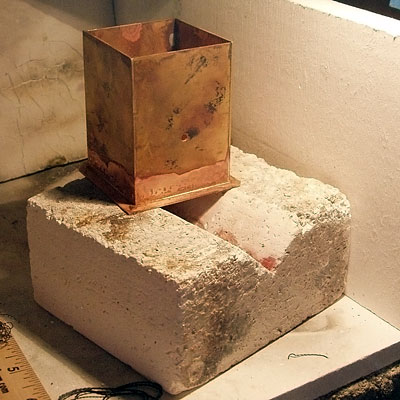
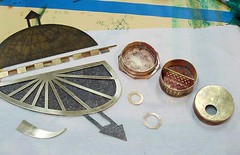
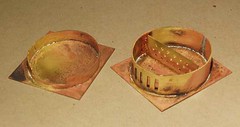
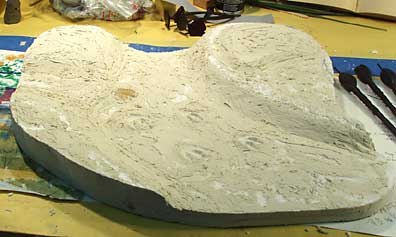
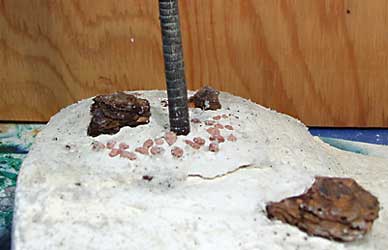
I had some time in the studio this week. Yesterday afternoon I made a rock. It's a funny looking lump here, actually a two-part rock.


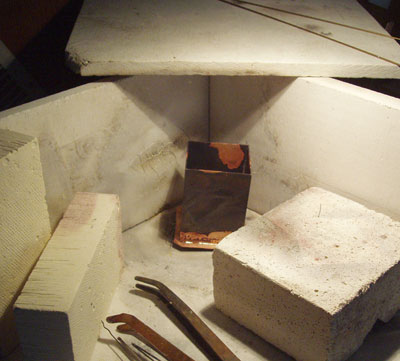
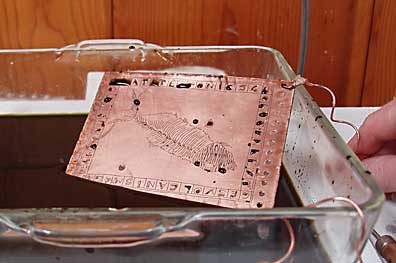
Here is is open. It's about 2.5 inches wide, and will be the cover for a rock book. I hammered it out of 18 gauge copper. It may meed some refining, and I'm not sure how to do the pages. But it was lovely to have some time to just focus on a project.

I am also trying to find a metal shear. I would like one that cuts up to 14 gauge brass, doesn't take too much workshop space, and doesn't cost a bundle. I haven't exactly defined "bundle" for my self. I just sold a book and am delighted to have unexpected money for tools. There is one in the Rio Grande catalog, which takes a lot of table space, but looks appealing. There is one in the Otto Frei catalog, which they may not have anymore, costs a lot, and takes very little table space. And I have a call in to a local place, that has metalworking tools. I hope they call me back today. After waiting for years to buy this shear, I'm feeling impatient to go ahead.

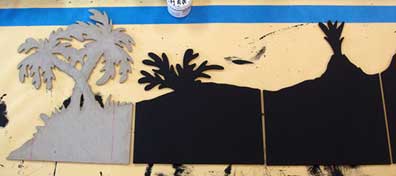
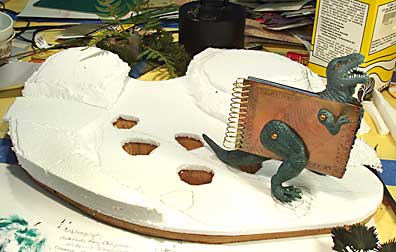
Today I want to make several fern book covers. I also need to get my slide application together for the Book Arts Jam. That is the next thing on my event horizon, and I am looking forward to it already. I hope to have a major portion of these books finished so they can be in the exhibition BABA organizes as part of the Jam.

Labels:

Monday, July 17, 2006

Small progress on huge volcano book

Volcano book in progress

I have finished the hinges for the big volcano book. (If you click on the image you can see it at Flickr. Clicking on "all sizes" will show a larger image) It's so nice to see it standing up. I included the dinosaur book for size comparison. I decided to add some little slopes at the end of the volcano, it seemed to stop too abruptly. I also had to do a number of tests to get the hinges the way I wanted them. My idea was that they should only fold one way, and they should allow a little extra space between the "pages" so I could add collage or metal to the pages.


Here it is, folded and lying on my worktable. I included a roll of painter's tape for scale. It's 32 inches high, and huge. I'm finding it very hard to work on because it's so awkward to turn over or move around.

Next I need to collage on the volcano. I'm not sure how this will look yet, I plan to start tearing out bits of paper and arranging them. I do have a cunning plan, which "cannot fail." (But of course will fail, or will present some other problem.)

I have also been distracted by the pinhole photography. I need a group of plant images for a fern book, and the pinhole effect seems perfect for that. Next I need to figure out how to transfer them. My first attempt wasn't totally successful.

And I volunteered to do a pinhole photography demo at the Book Arts Jam, presented by the Bay Area Book Artists on October 14th. So I'm also experimenting more with handmade cameras. I think the demo will be a matchbox pinhole camera. These seem so easy to make, and they take 35 mm film, which is less expensive to buy and to process. (I have a two-or-three-rolls a week habit at this point.) I am still adding pinhole links to my del.icio.us page, although at a slower pace.

Labels:

Saturday, June 17, 2006

A Huge Volcano Book


Above is the left "wing" of my big volcano book. I have been cutting out the pages this week. The material is Davey board. I'm using a jeweler's saw with an 11 inch throat and a number 3 saw blade. The saw is fairly coarse and it tears the back side of the details. I need to paint Polyvinyl Acetate, a very strong glue, on the edges. I can both glue down the little tears and make the edges a little stronger with the PVA. I'm bothered by the big bushy fern in this picture. It looks out of place to me, but it won't be too hard to cut another one. Maybe I'll just put a clump of grass there.


This is the center panel, the big volcano. I can't wait to see this one standing up. It's 32 inches high!


Here's the right hand "wing." Only one more panel to cut out. There will also be an accordion fold book in the center. After the panels are cut out and the edges are re-inforced with the PVA, I'm painting them with black gesso. I love this stuff. It's very expensive if you buy it from an art supply store. I got this from Nova Color. A gallon is $27. I can't remember what the shipping was, but it was a good deal. The downside is that you need to transfer it into smaller containers, unless you're going to use it up quickly. Luckily I had some dish soap containers around. It's thick and goopy but goes through a largish funnel okay. If you do this, wear some of those disposable painter's gloves. And do it in your garage if you can.

Labels:

Sunday, April 16, 2006

The Volcano Book, Part Two

I have been in the studio every spare moment this week, working on the pages of my Volcanism book. I hope to get it done by the middle of the week so I can take pictures for an Open Studios postcard. I wanted the dinosaur book and at least one other book in the photo. The pages are still sticking together, even after putting cornstarch on them. I think I'll email the people at Golden and see if they have a suggestion. If anyone out there has an idea, I'd love to hear it.


Here you see some of the pages clamped together with spring clamps. the light colored card on top is a template for the holes. Usually I clamp the pages and front and back cover together, cut the book out and drill the holes before taking off the clamps. This time I didn't do the holes in the beginning, so now it's a little harder to manage. The holes in the template are very small because I drilled a guide hole first. I go up in three or four steps to the size I want. It is dangerous to drill a big hole in metal without guide holes. I use the same method in stacks of paper because I have more control. It's easy to place the small drill bit in the right spot, so the holes line up.


The cover is etched, and I am very happy with it. In this photo it still has the beeswax resist on it. Next I need to decide if the back cover should be masonite (stronger) or copper (looks good but can be bendy.) I also have a palm tree cut out of artist's masonite, which may stay black, or may be painted. It's dramatic, anyway.

Labels:

Sunday, April 09, 2006

The Volcano Book

I am making progress on the volcano book. I sandwiched the paper for the pages between two sheets of copper and cut them all out as a unit. I like to work from the inside out, so I am collaging the pages first, then I will decide on the design for the cover.


In the image above, the part with the plume is the back cover and the partial volcano is the front.


Here are three sets of pages. They were textured with pumice gel, then painted with black gesso and dry brushed with several shades of grey. Usually I keep the surface of the collage dry, by applying PVA only on the backs of the pieces of paper. This is the method I posted about in December. I like to keep the page surface dry in books so the pages won't stick together over time. Acrylics seem to always stay a little sticky and the pages can fuse together, especially on hot days.

I'm using a different collage technique this time. I'm layering everything on with Matte Medium. It's faster and easier. I will probably dust the pages with cornstarch in the end. This has been a good way to keep them from sticking together in the past.

I am also using lots of transfers and paper aging techniques in this book. I have heard about some of them over the years, but haven't experimented with them much. I'm taking a wonderful Box Art class with Inge Infante at the Community School of Music and Art. She has been doing demos every week. It's inspiring to see someone else do art, and it's easier for me to see how the techniques could work for me when I get to see the examples and the demo. I have admired Inge's work for years and it's very nice to see how she works and to hear her talk about her process.

The other artists in the class are great people, Inge is a good teacher and I am having so much fun. I've made a few boxes, and will put them on the blog as time allows. I fall asleep at night thinking about what to do the next time I get into the studio, and I wake up in the morning thinking about what I have to get done so I can get back into the studio. I recently went through a long period of feeling unconnected with my art, and depressed. I am delighted with this new sense of urgency and play.

Labels:

Sunday, April 02, 2006

Dang!

After thinking about the options for 7 Extinction Events, I have decided to make a new background. I started getting lots of ideas for a more funky looking thing, which really appeal to me. The key comment that stays with me is "It's not like your other work." I think that's okay if it's a new direction. But in this case, the model railroad-type background isn't a new direction for me. Fun, but a dead end.


Here is the new maquette. The smaller volcano will be a separate book, there will also be a small shrub or broad leaved fern (maybe as yet undiscovered in the fossil record) that will be a book. I think the palm trees and the big volcano will be cut out of artist's masonite, which shouldn't warp when I paint it. My goal is to get the volcano book done in the next few weeks. I need a photo for a postcard. I haven't decided if I'm crazy or if this is a good idea, but I do like it. When I made the volcano into a book, it made me laugh. That's a good sign, right?

When I started blogging I wondered if I could make mistakes in public. I have always believed that it's best to be able to go into the studio and make a mess and then hide it away, for my own reference. I think it was a mistake to make the first background for 7 Extinction Events, and so far, it's not bothering me to have it be public. If I have to struggle with the next one, I might be embarrassed.

Labels:

Monday, February 20, 2006

Three day weekend, lots of art time

I got a lot done this weekend, it was lovely!

The landscape looked blocky, like piles of starofoam, so I first filled in the gaps with spackle. There is also spackle smeared across the tops of the hills.


The tops of the little hills were still very flat, so I pushed the palm tree trucks into the starofoam and then built up some more surface with DAS Pronto clay. I mixed it with a big blob of PVA to increase adherence. DAS isn’t supposed to shrink when it dries, but it did shrink a little where I hadn't mixed it with the PVA. You can see a horizontal crack that I'll have to fix.


Here's a detail shot. You can see a palm trunk and some redwood bark that I used to simulate rocks. The smaller rocks are from the hobby store. I have also painted the ground with coarse pumice gel, and the creek bed with fine pumice gel.

I am taking an assemblage class right now with Inge Infante. So I also have two boxes in progress. Three dimensional art is sometimes very hard for me and I have admired Inge's boxes for years. This seems like a good way to get a little more experience in assemblage. Hopefully it will translate into some little metal boxes I want to make.

Labels:

Tuesday, February 14, 2006

Progress on 7 Extinction Events

I tend to be very slow and meticulous when I work. My Dad has the same trait. Often I wish I could loosen up, and finish more projects, but I’m trying to just accept it. When I use a new technique for the first time, I do lots of research, and then some tests. The landscape for this book is a new technique for me.

I got some very dense polystyrene for modelers to block in the land areas. To get clear dinosaur footprints in the creek bed, I made them with Primo. They will be embedded in the creek bottom.

Building up the polystyrene to make the landscape
In the photo above the base is cut from a piece of plywood. I roughly cut polystyrene layers into the shapes I want. There is a small rise in the back for the palm trees. There are also holes in the bottom sheet of polystyrene so I can set the footprints in. All these parts were glued together with PVA and left to dry under books. I will put a few screws through the polystyrene and into the plywood base when it’s dry. There is some disagreement about whether or not PVA works with polystyrene, but I didn’t want to use a non-water based glue. After leaving the landscape under books for two days it feels like a very firm attachment.

There is often a point in the middle of a big project when I want to quit. I could just stick it in a cupboard and start something new and more exciting. I’m struggling with that right now. But looking at the landscape gets me excited again. Does anyone have any tips for staying engaged with your work when you're running out of steam? I hope it's not just me.

Labels:

Sunday, January 29, 2006

Landscape for 7 Extinction Events

7 Extinction Events dinosaur book
The book for “7 Extinction Events” is almost together. I used brass wire for the spiral binding. There is a problem with the front leg. If I don’t tighten it much, it tends to pivot forward, making the fierce tyrannosaurus look like a sitting rabbit. When I tighten the nut more, the foot splays forward, making him look knock-kneed. Not good. So I’m taking some plastic off the inside of the leg to make a closer fit against the cover.

I also started on the scenery. There was a creek behind our house that I loved when I was a kid. It was a wonderful place, full of mud puppies, polliwogs and other fascinating stuff. On the other side of the creek was a barbed wire fence, and lots of cows in a field. My brother and sisters and I pretended we were pirates and western settlers, and I don't remember what else down there. There was a spot where I could lie on the grass and daydream, completely alone and happy. I’ll leave the cows out, of course, but I want that kind of creek for my dinosaur book.

There should be footprints and some ferns and palm trees. I found some great palm trees on the internet. There are good instructions for painting them here. Because I’ve never done this kind of thing before, I’m making some tests. I painted a trunk and a cluster of palm leaves with some Golden acrylic paints.

tests for dinosaur foot prints
I also made a lot of samples for the ground that he’s walking on. I want the footprints to be fairly clear, they’re a reference to fossil foot prints. So I have 5 different materials that I’m testing for that.

Maquette for 7 Extinction Events
Here's a maquette of the whole set up to see how the parts look together. The red line is approximately the shape I’ll make for the base. When I like the shape and the relationship of the parts I’ll cut it out of plywood.

Looking at other people’s tests and maquettes is pretty boring, but I wanted examples to make my point. I think it’s very useful to make them when you’re doing something new. It’s a habit I learned when I was making jewelry. You don’t want to spend 20 hours on something just to mess it up in the last step.

Labels:

Sunday, January 22, 2006

Etching the book covers for 7 Extinction Events

Tonight I’m etching the copper covers for 7 Extinction Events. I decided on nitric acid because I like the finished look so much. I use beeswax as a resist. It is gradually dissolved by the etchant along the edges of the book cover and the overall look is one of a very crudy piece of metal. If I leave the copper in the etch bath long enough all kinds of rough edges appear. To a jeweler this is a really bad thing, you want a smooth, clean bite, no undercuts and no blurring of the lines you have drawn in the wax. But for me, the rougher, the better.

I have to say here, I don’t use nitric acid with my students and don't really recommend it. It gives off fumes as it works, and it’s very caustic. I keep big boxes of baking soda around in case of a spill. Tiny splashes can make holes in your clothes, and of course, damage your skin and eyes. When I think the etching is done, I’ll soak it in a solution of water and baking soda to make sure the acid is neutralized. If you want to try etching, do some research on ferric chloride, a slightly safer option. But be sure to read all instructions and the MSDS (manufacturer's safety data sheets) before starting.

Etching the book covers for 7 Extinction Events

You can see the fish fossil I drew in the beeswax here. The nitric is very dark because it’s getting old. The black dots on the copper cover are little drops of the acid. You can also see the 20 gauge wire I use to suspend the copper in the etching bath. They make great handles. What you can’t see is the fan just above, pulling air out of my studio.

I also spent a lot of time today doing my volunteer work for Silicon Valley Open Studios. They needed some data plugged into a spreadsheet. It’s mindless, clerical work, the kind of thing I used to do as a job, and I am pretty good at it. Now my obligation is almost over. I won’t have to put the time in right before the Open Studios event, when I’m likely to be pretty crazy.

Labels:

Sunday, January 08, 2006

7 Extinction Events: Progress Report

Not much art got done this weekend. Notice the third person here. I'd like to believe it isn’t my fault. I do have the collaged pages finished and I’m now coloring the dinosaur a little. He is a cheap plastic thing, (from ebay) and was a very ordinary grayish green. I put some blue-green acrylic paint on him and wiped it off, to bring out the detail. Tomorrow I’ll put a light brown on top. You can see I cut out a part of the body on one side to allow the book to sit inside the dinosaur. The arm and leg will go on the front cover.

Dinosaur and book pages

I used a jeweler’s saw to make the horizontal cuts in the dinosaur. It was an easy way to keep them fairly straight over the length of the cut. I am so used to it that I feel I have a lot of control. In this case I did make a jig that held the dinosaur in place by his feet so I could get a sort-of level cut. I wanted the book to be horizontal, which it isn’t. But it’s close enough for me. I did use a mat knife to cut the vertical cuts. This again seemed like the easiest way to get the long cut. There wasn’t enough room to maneuver the jeweler’s saw.

In general, jeweler’s saws are good for cutting lots of materials besides metal. I have cut museum board, Davey board, shells and many kinds of plastic and found objects with various degrees of success. Cutting Davey board is very easy, but it leaves a slight ragged edge that doesn’t show if the cut out areas are painted. Please note that shells when cut give off a dust that is harmful to your lungs. Be sure to wear a dust mask if you try this.

Labels:

Wednesday, November 30, 2005

A dinosaur with a book in his chest

instruction manual for the end (of the world)

This book is titled Instruction Manual for the End (of the World.) It sold to someone in L. A. and I haven’t seen him (the book) for ages. I know art is supposed to be about the process, but the objects I make are mostly very personal and I sometimes hate to see them go.

I decided to make another, similar book. This time I want paper pages in a copper cover. To start the new book, I found some great dinosaurs on ebay. The one I’m using is about 8 inches tall.


using sewing weights for collage

Here are two pages in progress.

Usually I have an idea for the inside of the book and complete one two-page spread, then work out from there, doing the cover last. This has been a problem at times. Sometimes I don’t make much progress and have different ideas and even a slightly different style over time.

This time I thought I would try to block in all the pages first, with a ground and sky. The ground is collaged and the sky is painted. Then I’ll go back and do the final collage and painting to finish them off. When the pages are finished I’ll have a clearer idea of what to do with the cover. I have a rough sketch of all the pages to work from.

Right now I’m putting the details on each page. They look a little too plain to me, so I think I’ll go back and paint a light wash over them and add some scratchiness.

I’m using sewing weights to hold down the pages. I wanted to glue the red and gold ray across both pages. To keep the pages from moving while I work on them I use sewing weights. They are about an inch high and just right for the scale of my work. They came six in a set from JoAnn’s, a fabric store. When the glue is dry I can cut through the center of the two pages with an exacto knife to separate them.

Labels: