Thursday, September 03, 2009

A box, a hole, some photo paper - Magic!


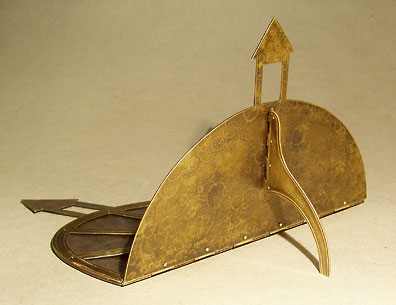
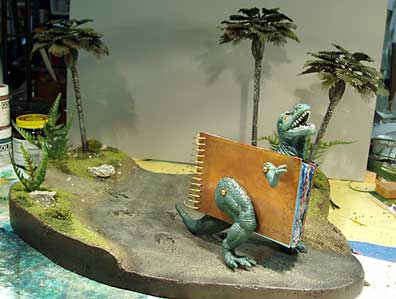
Tyrannosaurus photoventris, ©2009, 7 x 4 x 6.5 inches. That's a lens cap/shutter on his navel. He takes pinhole photos of the late Cretaceous using paper negatives.

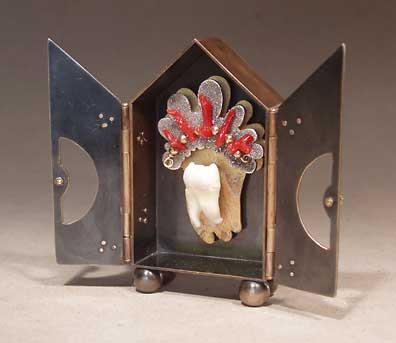
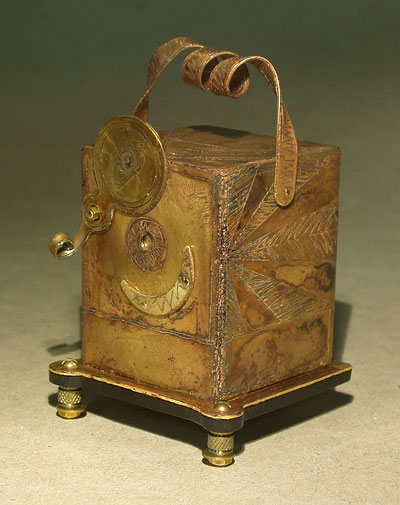
My two brass pinhole cameras, some of my old snapshot camera collection, my funky pinhole cameras and one of my father's cameras will be shown in the collections room of the Peninsula Art Museum until November 22nd. You can also see photos from some of the cameras. The funky pinhole and snapshot cameras are the inspiration for my brass pinhole cameras. My childhood memories of my dad's darkroom are the beginnings of my interest in photography.


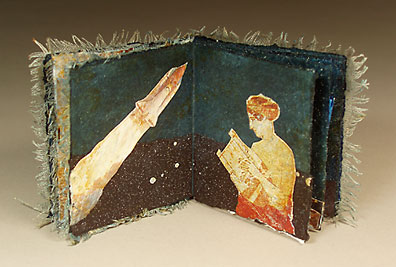
A photo of the late Cretaceous, taken by Tyrannosaurus photoventris. This photo is groundbreaking in many ways. It is, of course, one of the first photos of the late Cretaceous. And it also reveals a surprising first sighting of Godzilla!


The Memorycam is the first pinhole camera I made. It uses photo paper as film and takes photos of memories.


Memory 436, taken by Memory cam.


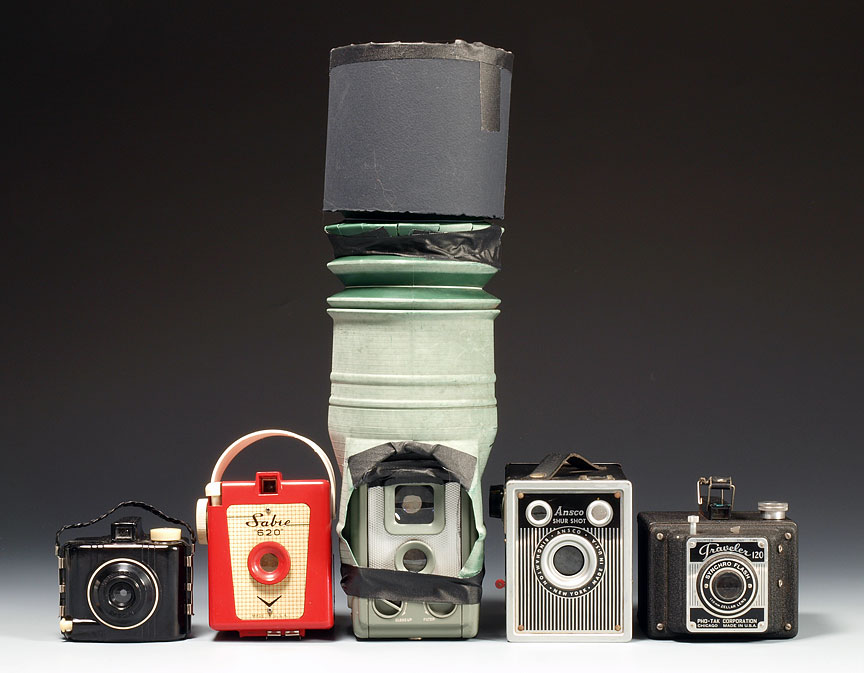
A few of my snap shot cameras and one of my ttv contraptions. From left to right: Baby Brownie, Sabre 620, an Anscoflex with a gutter pipe contraption, Ansco Shur Shot, Traveler 120.


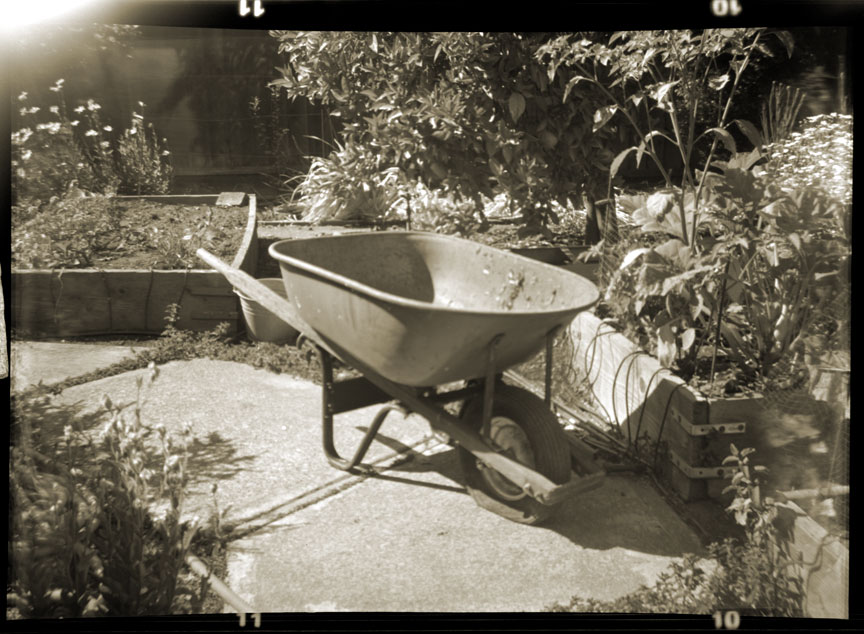
A photo from the Traveler 120. When I get a new camera I put film in it and rush out into our garden to try it out. This was also an experiment in creating sepia toning in Photoshop. I develop the black and white film myself, then scan it into my computer.

The show is up now, and runs through November 22nd, 2009. The opening is September 13, from 1 to 4. You may know this museum as Twin Pines. It is located at 10 Twin Pines Lane, Belmont, California 94002. Hours are Wednesday-Friday 12 - 4, Saturday, Sunday, 1 - 4.

Labels: , ,

Monday, March 16, 2009

Free For All!


Dreaming made Easy, included in Free For All, an exhibit of downloadable artist's books at Fiji Island Mermaid Press. If you have a computer and a printer, you can have, for free, books made by eight talented artists. It's a fantastic show - wonderfully varied and inspiring. Below is Marc Snyder's press release:

"The Fiji Island Mermaid Press is proud to present “FREE FOR ALL”. This online exhibition of artist’s books invites the viewer to download and assemble the books on display. The eight artists who have created books for this exhibition are Pati Bristow, Ginger Burrell, Warren Craghead III, Marti Haykin, Adele Henderson, Robert Hirsch, Judith Hoffman, and Marc Snyder. The exhibition will remain online indefinitely.

Each book in the show is available as a downloadable file. The viewer typically prints no more than one or two pages of artwork and text, which are then trimmed, folded, and cut to create miniature books. The artists have provided instructions for the viewer for the entire process.

The exhibition explores the boundary between cyberspace and “the real world”, as the show is only finished when the visitor to the site has downloaded and assembled his or her own books. Essentially, the exhibit exists wherever someone creates their own collection of books.

Brief biographical and professional information about each participating artist accompanies the artist’s book in the online exhibition. Links to view more of his or her artwork are also included.

For additional information about “FREE FOR ALL”, please contact Marc Snyder at marc@fimp.net"

Labels: ,

Saturday, August 16, 2008

We travel in Boats


We Travel in Boats, 9.5 x 4 x .5 inches closed, ©2008, Davey board, Hahnemuhle Ingres paper, Prismacolors, acrylics, Dr. Martin's white ink. Larger view on flickr. (click "all sizes") This will be donated to the Book Arts Jam silent auction.

I had this drawing left from my tests for In my Dreams We travel in Boats. The cover was cut from Davey Board with a jeweler's saw and painted with acrylics. It's interesting to see the two books side by side. From the front, the content is very similar. The back of this one is blank though.

Labels:

Monday, August 04, 2008

In my Dreams We travel in Boats


In my Dreams We travel in Boats ©2008 6.5 x 3.25 x 1.75 closed. The open book is about 17 inches long.


There is no real front or back in this book. It is based on dreams I have had about boats. They are large, simple boats, like rowboats with no oars, or lifeboats. They are always white. The web page includes text from parts of the dreams. There are three pages of notes and photos showing the stages of construction.

Labels: ,

Friday, May 23, 2008

Levert/Casanova


Levert/Casanova, 6.5 x 5 x 2 inches (closed), copper, brass, record found on the street, mechanical parts, broken mirror, acrylic paint, Prismacolor pencils, book covers, fabricated, wire edge binding. It may look like I'm being incredibly productive, but actually I'm finishing things that were abandoned in mid-stride. I'm also trying to think of going to the studio as work, so I don't make other appointments in that block of time. There is a web page with more views here. And for larger photos, check out my flickr artist's books set.


The cover is an old record I found on the street. It is badly scuffed and very appealing. The pages are old book covers. I started by attaching the objects to the cover, alternating between painting and attaching stuff with nuts and bolts and epoxy. I was mostly thinking about sound, music, and the feelings music can convey. The rest of the choices were made intuitively. I believe the mechanical thing on the cover came from the inside of an old walkman. I had drilled holes in the pages so I could bind the book with a spiral. When it was close to finished, I tried it with the spiral binding. The spiral had to be really big in diameter to accommodate the thickness of all the pages, and I hated it. So I set the project aside. Then I discovered Daniel Kelm's wire edged bindings. His are beautifully done and technically masterful.


It occurred to me that I could use a low-tech version of the wire edge binding for this book. I cut two notches in the edge of each page. (1) In the detail above they are hidden under the notched copper. I cut tooling copper into 1 inch strips, folded them in half the long way and oxidized them in liver of sulfur. The tooling copper has notches to match the ones in the record/cover. I cut brass wires (2) just shorter than the length of the strips of copper. To attach the strips of copper to the pages I laid the wire in the fold of the copper and riveted the strips onto the edge of the page matching up the notches. I couldn't get the rivets to form nice little round heads because the tooling copper is so thin and soft and the materials underneath are also soft, so I just hammered the posts over. (3) I'm using ear posts for these rivets, but you could also use wire, bending it on one end before inserting it into the hole, then cutting the other end off and tapping it down. Just make sure the wire is a snug fit in the hole. In the detail above you see the ear post head on the right. The jump rings (4) that hold the book together are copper wire. Several of the wires wanted to slide out of the tooling copper strip, so I hammered the ends of the strips a bit. (5)

Labels:

Tuesday, May 20, 2008

Instruction Manual for the Moon III


Instruction Manual for the Moon III, 2.75 x 4 x 2 inches (open), Brass, copper, copper, clock parts, rulers, found objects, fabricated. This little book is the third of a series of three, probably the last I will make. It may be my favorite of the three. There is a web page here with more views.


Instruction Manual for the Moon III, pages 3 and 4. The gear at the upper left actually turns. Here are links to Instruction Manual for the Moon and Instruction Manual for the Moon II.

What's with my name and url on the bottom of the image? I get people hot-linking to my images without asking. You would think some of them, like online newspapers, would know better. And when they use an image of a book by one of my students, it feels particularly bad, because I feel responsible for where they go. In almost all cases there is no link to my website and no credit for the artist. I can only track down a few. So I decided I want at least my url as a part of each image. This seemed like the least intrusive way to do that.

Labels:

Saturday, February 16, 2008

Bear With Me Again


While making Bear With Me, I made some mistakes and changed my mind about what to include. I also made some tests to see how I would like a certain effect. So I had a lot of pages or pieces of collage parts that didn't go into the book. I hate to just toss these leftovers. If I add them to my stash of collage material, they often don't get used. Occasionally I make postcards or greeting cards with them. But this time I made three little books. They are each 3 inches wide. It was also a chance to test some binding styles. These books can be seen larger in my artist's books flickr set.


The book on the left is bound with a pamphlet stitch in two places. I don't like this one much, the book splits open in the center, my thread is too heavy and the pages are also heavy. However it has some nice imagery in it. The middle book is my test for wire edge binding. I like this one a lot. I'm not sure what the structure of the one on the right would be called, it might be a block book. The pages were folded, as for a codex, but I glued them back to back instead of sewing. The maps are white on the back, so gluing the pages back to back hides all the whiteness.


Here's a quick sketch of the structure. The pages lay much flatter than I expected, pressed overnight under heavy books. And it feels very nice in my hand, an important thing for books. I was running out of imagery at this point, so I had to make a few things to complete the book.

Labels:

Saturday, February 09, 2008

Bear With Me


Bear With Me, ©2008, 5.5 x 4.5 x 1.5 (closed). Museum board, topo maps, collage, photos, handcarved rubber stamps, handcarved pencil eraser font, transfers, memories, dreams. Wire edge binding. More photos of Bear With Me here.


This book started as a quick project to do over the Christmas holidays. I wanted it to be fast, reproducible as black and white photocopies and very cheap. I planned to give them away, or sell them for under $10. How much of this did I accomplish? Zero. I couldn't give up the colors, I decided to make multiples on my color printer. I made 4 or 5 pages several times because I decided I didn't like an element already glued down and it couldn't be collaged over.


I was thinking about bears when I started the book. I dream about bears occasionally. I know bears are important in American Indian thought. And I love the idea that they are powerful spirit figures. But in working on this book, I decided for me they may represent my animus. Just as I finished the book I dreamed about a huge sleeping bear. I wanted to poke it and make it come after me. I wasn't afraid, and as I woke, I was about to poke it.


This is wire a edge binding, developed by Daniel Kelm. The page above has notches cut in the spine for the wire and strips of paper holding a piece of 18 gauge wire along the spine. I covered all the edges of the board (page) with map. I found the binding instructions in Books Unbound by Michael Jacobs. It feels a little more floppy than Coptic binding to me. The effect is similar, it works great for board or single sheet books. And it is much easier to do. I just connected all these pages with a square knot.

Labels:

Thursday, December 27, 2007

christmas zine


This was my Christmas card for my family this year. I made it from photos of our 2005 Christmas, mostly taken by my son. There were several rules I tried to follow: include at least two photos of everyone, include random shots from walks, and field trips, no page should have just one photo. Oh, and I culled out the most unflattering photos. I think my sisters will thank me for that. It's all color, a two sided photocopy, each book is on one sheet of legal sized paper.


I have failed at metal casting and printmaking because I hate many-step art processes. I have been wanting to make some kind of book multiple, but was worried about having to sit and do the same thing over and over. I made this in about 12 hours, and spent another 4 hours assembling it. I think it cost around $25 for 15. If I had remembered to put the title and a birthday message on the master, it would have gone together quicker.


This is my master. The white lines indicate cuts, the black ones are the folds. They aren't there in reality, I added them in PhotoShop.

This was inspired by sinoun's zine, "small tasks of labour suit her slender bones." You can see her zines at anatomic air press. stolshsb is poetic and mysterious. I also love "the art of smelling and feeling paper."

Disclaimer: I'm using "zine" very loosely. It really seems to mean an ongoing edition, like a magazine. Mine are one-shot deals, but they are are meant to be fast (sort of) and cheap (relatively) to make.

Labels:

Thursday, October 11, 2007

Tooth Icon


Another partially finished project, finally done. My son gave me two teeth 5 or 6 years ago. The deal was that I would make him something with one of them, and I can keep the other tooth. This is the first completed project. I'll probably keep it around for a few years, enter it in some shows, and then offer it to him. I don't have any more toothy plans right now, but I'm sure some ideas will come along.

See more photos on my web site.
Read about most of the processes involved in making Tooth Icon.

While making the tooth icon I was thinking about my son's childhood, how much I miss that little boy. He's a charming adult, and I enjoy him very much. But it was fun being a mom and I miss that. So this is an icon to that part of my life.

Because I sometimes hate to use my precious materials, I thought I'd check ebay and see if I could find other teeth for sale. Of course, I did find some. But they looked gross to me. I find that so funny. This tooth doesn't bother me in the least. But a stranger's tooth? Yuck! I'm surprised at my reaction, considering that I had boxes of stuff like mummified mice and rabbit skulls years ago. I finally gave them to my husband, he has probably used most of them in his projects.

Labels:

Tuesday, September 18, 2007

Purple Mountain Observatory


From Wikipedia: "Purple Mountain Observatory, also known as Zijinshan Astronomical Observatory, is an astronomical observatory located on the Purple Mountain in Nanjing, China."


I started this book in 1999 as a test for hinged pieces of stiff watercolor paper that could be sewn together with a Coptic stitch. When I left it I was very unhappy with some of the imagery and thought I wouldn't find a resolution. Of course now I can't remember how I envisioned the final book. Was there supposed to be a separate cover? Why are there an odd number of pages and no end papers in the back? Last week I did a little more collage and some painting. Now, at last, I feel happy with it. There are more page views and information on my web site.

I have at least 10 more unfinished projects in my studio. They were abandoned because I couldn't find a way to resolve a problem, or I didn't have the skills to carry out a technical part. Occasionally a more alluring project came along.

I am starting a list, maybe more of them will get finished. I would like to have some new work to take to the Book Arts Jam in October.

Labels:

Saturday, September 01, 2007

Prayer Icon and Instruction Manual


Prayer Icon and Instruction Manual. 7.5 x 6 x 4.5 inches. The little book is 2.5 inches high. Prayer flags, candles, gas tank float, old iron, doll face, bee's wax, found objects, watercolor paper, collage, acrylics.


Instruction Manual for Prayer Icon, pages 6 and 7.

My work is changing, I'm having a hard time with it right now. Sometimes I don't feel very connected to it. And sometimes I don't feel connected to any part of my inner life. It has been painful. To keep working I start little projects that I think will be "just for fun." This one started with an old iron, which looked so much like an icon, I wanted to do something with it. You can see more views and read more about it on my web site.

Labels:

Sunday, April 22, 2007

Dream Focusing Device, done at last!


Dream Focusing Device, Judith Hoffman, brass and sterling silver, 5.75 x 8 x 6.25 inches, fabricated. How to use the DFD: Exposing the Dream Focusing Device to moonlight during the full moon activates the metallic priciples in the instrument. It will focus dreams for 28 days after a 2 to 3 hour exposure, but will lose power slowly over that period of time. Short exposures to moonlight throughout the month will recharge the metallic principles. Recharging can occur on cloudy nights, although the time needed will increase with the amount of cloud cover.


Dream Focusing Device, back, Judith Hoffman, brass and sterling silver, 5.75 x 8 x 6.25 inches, fabricated. See a larger version of both images on Flickr.

At last it's done. I love the way things go together quickly in the end. I often feel I'm plodding along, not making much progress in the middle of a project. Then suddenly, all the parts are ready to be riveted together, and the last stage goes quickly.

What's next? Maybe a little box that is a kind of cabinet of curiosities. Or a tooth icon. Or another brass camera. I also have a James Castle blog entry close to being ready to publish, and I am working on a riveting tutorial for my web site. This one will be on making rivets with brass or copper wire.

Labels:

Monday, February 19, 2007

zero to twelve


zero to twelve cover
Originally uploaded by bertmac.
I finished this book over the weekend. I am having fun with these found object books, and keep thinking of new ideas. I also keep thinking "why is this so fun, when some other projects seem so tedious?" In my mind, this book isn't "serious" while something like the dream viewing device is. I suppose these ideas come from art school. There was a lot of talk about "high art," "low art," and everything in between. I don't see any of my work as high art, so why do I worry about what is serious? Maybe it's more a question of being true to the ideas that I hold about my work. I want it to convey a message, and I feel these fun books don't.

For more views and information go to my web site, or my flickr page .

Labels:

Thursday, October 12, 2006

Memocam Information


Memocam
Originally uploaded by bertmac.
Now Craft has a link to my tutorials page! Unfortunately there is a small mistake. I don't have a tutorial on making metal cameras on my tutorials page. There is a tutorial to make a matchbox pinhole camera. And I do have the metal book tutorial they mention.

Here is a quickly written description of making the Memocam:

You can see the first stage here.

I use very basic metalworking and jewelry skills. The sides were cut with a metal shear. If you are patient you could cut them with a jeweler's saw. There is some filing to clean up edges, then the box is soldered (actually braised) together. I use an acetylene torch and silver solder. To make the base I cut the flange pieces to just fit inside the box. I can't do precise measuring, and approximating usually works fine.

The design on the camera is etched with Ferric Chloride. Warning: very caustic acid. The coloring is a heat treatment.

The base has a piece of black plexiglass under the brass base. I cut it with a jeweler's saw. The little legs are beads and washers, held in place with nuts and bolts. The shutter is also attached with a nut and bolt. It's light tight in that area because I put the pinhole inside with a piece of gaffer's tape, which also covers the nut and bolt.

The handle and the crescent shaped stop for the shutter are attached with rivets made from earposts. There are instructions on my tutorials page for these rivets.

Labels:

15 minutes for the Memocam

I assume most of you are artists. And you probably all have moments of feeling like you're working in obscurity, with no notice, and no appreciation from other people (aside from your mother, of course). I feel that frequently. Well, today, I feel noticed. First, a week ago, Marc Snyder of Fiji Island Mermaid Press commented on the early stage of my brass camera. (Marc has a blog and web site. I love his Artist's book of the month club.) Then I got an email from Tinkergirl, saying she had linked to my blog. She is into the "lighter side of steampunk" at Brass Goggles. And here's my Memocam on Make magazine's web site! I am so pleased. Is it too uncool to say I'm delighted? I have had a ton of views on my "brass pinhole cameras" flickr set. And some very nice emails from a bunch of people. Including some fascinating links to check out. Is this my 15 minutes of fame? I am loving it.

Labels:

Tuesday, October 10, 2006

Memocam


Memocam
Originally uploaded by bertmac.
It's done, just in the nick of time. I'll take this little gem to the Book Arts Jam with me this coming Saturday. There are some small problems, but I have ideas for the next one. And I can't wait to start.

On the base the instructions read: 1. Fix memory in your mind. 2. Point Memocam toward memory. 3. Expose film. Click on the image to see more info on my flickr page.

Labels: ,

Monday, September 04, 2006

Fern Book


I made a fern book this week. The cover is hammered copper, etched in ferric chloride. I patinaed it with liver of sulfur, brushing with a very soft brass brush between layers. The pages are 90 pound watercolor paper, colored with acrylics and Prismacolors. I painted and scribbled all over both sides of a single large sheet of paper. Then I sketched the fern pages around the edges of the paper (to keep the deckle on the bottom of each page). There is another view and larger images on my flickr page in the "Artist's books" set.


I originally thought I wouldn't put any content on the pages. I was thinking a "table of contents" page, some chapter headings, but no collage. In the end I couldn't stand it. I had to have some collage in there. These little bits of photos are from my pinhole camera. I have always been fascinated to see the backgrounds of photos in magazines. There are often odd looking shrubs, people glancing over their shoulders, stray dogs walking by. I love these little bits of real life in the middle of a set-up looking shot. We never have control over everything. That's what these little pieces of photos make me think of. Some are completely unreadable, just fuzzy green and blue shapes.

Labels:

Sunday, April 30, 2006

A change of pace


My studio is in a room that was added on to our house fifty-five years ago. It has a door that goes out into our side yard where I grow vegetables and flowers. Right by the door is an old maple tree that casts a lot of shade. There is a bare spot under that tree. I have wanted to make some kind of assemblage in that area for a long time. This morning Jim was digging up a vegetable bed for me. I found an old, partially rotten table I had made with four fruit crates, and drug it over to the bare spot. Then I started gathering stuff from the yard. I had a figure made of a chunk of wood and an altar that was hanging on our fence under a bottle brush. They were both buried in a messy part of the yard, where I never got to enjoy them.

Jim came over and started to get into it. Sometimes it's hard for us to work together. I want things well made and sturdy. Jim isn't concerned if they fall apart in a few years. In fact they probably become more materials for his projects. But we spent about six hours on this and I want it to be there for awhile. Today we were in some middle ground. It's not a house project, if it falls over it doesn't really matter. So I was able to not worry so much about the things that were wired together. And Jim was tolerant of my desire to use brass screws and galvanized nails.

Jim is very good at arranging three dimensional things. I am good at putting things together. It felt like a real collaboration because we both contributed skills and ideas. For me this is a memorial for someone who died years ago. I'm not sure what it represents to Jim, maybe just having fun. Nice day!

Labels:

Sunday, February 26, 2006

7 Extinction Events Finished!

I’m sorry I didn’t post in the middle of the week. The flu caught up with me, but I’m much better now. But, here is the finished landscape.

7 Extinction Events

I’m very pleased with this. I love having a setting for the book. Unfortunately, when the book is open, the dinosaur doesn’t look right. I don’t think it’s a fatal flaw.

After building up the hills I painted the whole thing black, then put on a layer of very dark earthy brown. I dry-brushed a lighter brown on the hill areas and grayish ochre on the creek bed. Then I painted the rocks several light shades. Then I put on the grass, palm leaves, bushes, etc. These two web sites were very helpful: Conquest Miniatures and Dr. Faust’s Painting Clinic. Email me if you want more details, I'm leaving out some here because it's not that interesting.

When I got the idea to do the landscape, I thought “that’s a hobby, it should be fairly easy to do. Not like the hard and tedious work of making jewelry or metal objects.” I was so wrong! There are lots of different ways to accomplish a given effect. You have to know your materials and a wide variety of techniques.

It was hard to find the exact materials that these online tutorials talk about. Our local “big” hobby store didn’t have much of a selection of landscaping materials or paint. I went to J & M’s Hobby House in San Carlos (California) and was able to get most of what I needed. This is a nice hobby store. They have K&S metal supplies (brass and copper in sheet, tubing and strips). The service is good, the guy I talked to was very knowledgeable and helpful.

What’s next? I have to clean off my big worktable and take photos. I will show something of my photo process in the blog. Then I want to start on two metal projects that have been languishing on my bench for a long time. The smaller, almost finished one is a tooth icon. I’m not even sure if I’ll like it when it’s done, but I’m committed to finish it. The other is a time consuming project that I have barely started and need to get back to. I also have an idea for several more books with landscapes, but they will wait for a while.

Labels: